
Apr 27, 2016
D2iQ
D2iQ
12 min read
In the first two posts in this series, we went through the processes of configuring DC/OS, and then installing it, starting a Docker application and setting up some public load-balancing infrastructure. Really, these are all of the basics you need to get started.
But DC/OS has dozens of great features, applications and extensions! Between the advanced layer 4 Minuteman load balancer; SQL and NoSQL databases such as Crate and ArangoDB; and Apache Spark, it's hard to decide what to learn about next.
Luckily for you, it has already been decided: We're going to learn about running existing applications on DC/OS. We'll do this in three steps:
- Install the DC/OS command line: The DC/OS command line is one of its most exciting features, finally bringing your entire cluster to your command line. A common problem in working with containers distributed across a cluster is that it's hard to interact with the containers themselves. Accessing their local files, finding the host and ports they're bound to, and easily collecting information about groups of related containers are often challenging tasks. The DC/OS command line is an awesome, easy way to do all this and more, as we'll see.
- Install Cassandra: Cassandra is a scalable, proven NoSQL database that many of us use in production. With the DC/OS Cassandra framework, you can easily deploy an automatically monitored and easily scaled Cassandra cluster. Although in this post we'll be looking at Cassandra, there are several other databases available for DC/OS to fit whatever needs you have—be they SQL, NoSQL or time-series.
- Install KairosDB, (drawing from this Mesosphere tutorial): Applications are easiest to run on DC/OS when they're stateless. In this post, we'll see how popular applications that follow stateless design principles, such as KairosDB, are easy to adapt for deployment on DC/OS. (A benefit of the stateless approaches—often used in conjunction with containers and microservices—is that when you need more instances of an application, you can simply add more containers. If a container crashes, you can simply restart it elsewhere without any special ceremony. Many applications can be adapted to function this way, as long as they use an external database as a communication, synchronization and storage medium.)
Installing the CLI
Before we get started with running our second application stack on DC/OS, let's install the CLI and take it for a test drive. We're going to install the CLI on the bootstrap node, since that node is able to reach the agents by their private IPs. First, you'll need to set up our bootstrap node's Python environment. Just run:
$ sudo easy_install pip$ sudo pip install virtualenv
To do that, simply click on your login information in the lower left of the DC/OS interface.
It'll pop up with a few options, including "Install CLI". Then, you can paste the command DC/OS gave us into the console. Your command probably looks like this:
$ mkdir -p dcos && cd dcos && curl -O https://downloads.dcos.io/dcos-cli/install.sh && bash ./install.sh . https://$PRIVATE_MASTER_IP && source ./bin/env-setup
The one thing you'll need to do is change the public master IP that DC/OS provided into a private cluster IP (it probably starts with 10.0. if you're using AWS and following this post series). We'll let that run for a few minutes while it installs.
Now let's try something cool: run dcos service. It will ask you to visit a URL in your browser. Unfortunately, that URL is using the private cluster IP of the master; we need to visit the public IP of the master. Replace the CLI's prompt's IP address with the IP address that DC/OS originally gave us, visit that URL and log in. You should be presented with an authentication token you can copy to your clipboard and paste in the CLI.
There's one last step to be able to SSH into our nodes, which is to make a file so that SSH will know how to connect to our nodes. DC/OS was first built for CoreOS, and although CentOS is fully supported, the CLI does not yet automatically handle this. I wrote this file to ~/centos_ssh_config:
User centosIdentityFile ~/genconf/ssh_key
Now, let's try a few commands. For example, check that Marathon is running by doing dcos service. Or check the tail of Marathon's log file by doing dcos service log marathon --ssh-config-file ~/centos_ssh_config (note that since the CLI is actually grabbing the log via SSH, we need pass our SSH config file).
We can also jump over to nodes on our cluster, to rapidly debug issues at their source. List all the nodes in the cluster by running dcos node. I've been adding nodes to my cluster, so here's what my output looks like.
[centos@ip-10-0-0-114 dcos]$ dcos node HOSTNAME IP ID10.0.0.10 10.0.0.10 4cb15493-2ca7-4b8b-8d4d-83b76cdcf7bb-S810.0.0.11 10.0.0.11 4cb15493-2ca7-4b8b-8d4d-83b76cdcf7bb-S710.0.0.116 10.0.0.116 4cb15493-2ca7-4b8b-8d4d-83b76cdcf7bb-S010.0.0.12 10.0.0.12 4cb15493-2ca7-4b8b-8d4d-83b76cdcf7bb-S910.0.0.13 10.0.0.13 4cb15493-2ca7-4b8b-8d4d-83b76cdcf7bb-S1110.0.0.86 10.0.0.86 4cb15493-2ca7-4b8b-8d4d-83b76cdcf7bb-S110.0.0.87 10.0.0.87 4cb15493-2ca7-4b8b-8d4d-83b76cdcf7bb-S2 10.0.0.9 10.0.0.9 4cb15493-2ca7-4b8b-8d4d-83b76cdcf7bb-S10
Let's pick a node to SSH to—how about the first one? Soon, that'll be as easy as copying the ID field so that you can just
$ dcos node ssh --mesos-id=4cb15493-2ca7-4b8b-8d4d-83b76cdcf7bb-S8
For now though, we'll need to specify that SSH config file, as well as explicitly override the user. This is the full command we'll use:
$ dcos node ssh --config-file=~/centos_ssh_config --user=centos --mesos-id=4cb15493-2ca7-4b8b-8d4d-83b76cdcf7bb-S8
This will actually drop us into a shell on that node! If you've ever tried to run containers in production without a solution to tracking down the hosts running those containers, you've surely struggled to figure out where to look at host stats and attach debuggers. DC/OS makes containers much easier thanks to this awesome feature for production debugging.
Installing Cassandra
Now that we have installed the command line, let's install Cassandra.
$ dcos package install cassandra
Now, although Cassandra will be healthy and running, we also need to enable the Thrift RPC layer for KairosDB. Just go to Marathon and change the environment variable CASSANDRA_START_RPC to true:
You should see Cassandra start up three nodes, which can take up to 10 minutes to stabilize and reach a healthy state. Go grab yourself a coffee, you earned it.
If you don't see Cassandra starting up any nodes, and it is showing up as "healthy", it's probably a configuration mistake—they only have 8GB of disk space, but we really should've chosen at least 20GB of disk space. Go ahead and spin up three more VMs, each with 20GB disk space this time. You can reuse the installer by replacing the old agent IPs with the new agent IPs, and running the --install-prereqs, --preflight, --deploy, and --postflight steps. You can ignore errors from deploy and preflight due to the masters already having DC/OS installed.
Once you've added these nodes and they've come online, which you can see from the Nodes tab of the DC/OS UI, Cassandra should complete its deployment.
Debugging with the DC/OS UI
How did we debug this issue with disk space? Many problems can be solved just by reading the logs of the right process. Besides the CLI, DC/OS's UI can help you easily find the logs from a specific task, to help you debug common problems.
Let's walk through the process we used to uncover the disk-space shortage using the UI. First, we went to the services tab, and clicked Cassandra.
Under the Tasks tab (selected by default), we can see all the running and finished tasks of the Cassandra framework. If we wanted to debug Cassandra nodes, we could click through to their details. Instead, however, we need to debug the scheduler itself. To find the task running the scheduler, we went to the Details tab in the popup summary, and we clicked the scheduler ID to jump us to the container in which Cassandra's scheduler is running.
Sometimes, you just want to grab some files from a task, and the default tab in this view lets you browse and download those files. From there, it was as easy as clicking on the Log Viewer tab to read through Cassandra's logs.
Notice that the log viewer lets you look at the Output & Error. For some applications (such as Cassandra nodes), there will be more logs you can choose between. Sure enough, we found the culprit after a minute of reading:
INFO [2016-04-20 15:26:44,723] org.apache.mesos.offer.OfferEvaluator: EnoughCPU: true EnoughMem: true EnoughDisk: false EnoughPorts: true HasExpectedVolumes: trueWARN [2016-04-20 15:26:44,723] org.apache.mesos.offer.OfferEvaluator: No Offers found meeting Resource constraints.WARN [2016-04-20 15:26:44,723] org.apache.mesos.offer.OfferEvaluator: No acceptable offers due to insufficient resources.
The bit where the log says EnoughDisk: false is a good hint that we needed bigger disks. This little episode just goes to show how easy it can be to debug distributed systems issues with DC/OS.
Installing KairosDB
To launch stateless containerized applications on DC/OS, we're going to use Marathon. Marathon has a UI and thoroughly documented JSON API for launching, managing, scaling and terminating containers. The DC/OS command line makes it very convenient to interact with Marathon through the dedicated subcommand dcos marathon (try running it to see all the options it provides).
We'll start by creating a file called marathon-kairosdb.json. It's contents are almost the same as the marathon-kairosdb.json from the tutorial, but we had to make a few changes, such as removing the role restriction, and adding service port information. Here's the contents of the file:
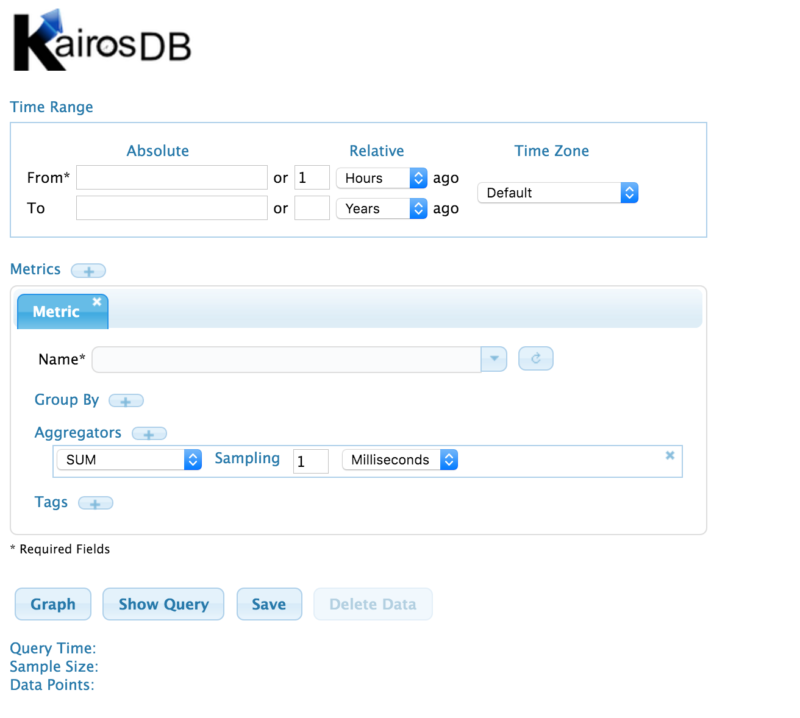
{ "constraints": [ [ "hostname", "UNIQUE" ] ], "labels": { "HAPROXY_GROUP": "external" }, "container": { "docker": { "image": "mesosphere/archlinux-kairosdb:master", "network": "BRIDGE", "portMappings": [ { "servicePort": 80, "containerPort": 8080, "hostPort": 0 }, { "containerPort": 4242, "hostPort": 0 }, { "containerPort": 2003, "hostPort": 0 }, { "containerPort": 2004, "hostPort": 0 } ] }, "type": "DOCKER" }, "cpus": 0.5, "env": { "CASS_HOSTS": "node-0.cassandra.mesos:9042", "REPFACTOR": "1" }, "id": "kairos", "mem": 500}Since we're going to host KairosDB on port 80 now, let's first shut down our blog (it wasn't stateful, anyway): dcos marathon app remove my-blog. Now, just run dcos marathon app add marathon-kairosdb.json to start the KairosDB server. Soon, you should see the healthy task running. This time, visit your public agent's IP in your browser, and you should see KairosDB running.
One pattern you see over and over with containers running on DC/OS is that they have environment variables that parameterize their connections to databases and other services. By waiting to specify those connections until you launch the container, it simplifies experimenting with the network you use. This way, you can easily experiment and roll out HAProxy, Minuteman or other networking layers for your DC/OS cluster.
If you'd like, you can use your new DC/OS skills to follow the rest of the KairosDB tutorial and install Grafana and the GitHub data populator.
See you, Space Cowboy
In this post, we learned several new skills:
- How to install the DC/OS command line and troubleshoot SSH connections
- How to install Cassandra (along with some practice scaling up our cluster)
- How to debug containers in production with DC/OS's UI
- Tips for rolling out stateless services on a DC/OS cluster
At this point, you should have all the tools to get started with DC/OS—you can build a cluster, expand it when needed, and run both services and databases in containers. And remember, if you need more information, you can always track it down on the DC/OS website, GitHub repo or documentation, as well in Mesosphere's documentation.
We're excited to see what you do with DC/OS!