
Apr 26, 2016
D2iQ
D2iQ
10 min read
In the first installment of this guide, we learned about the newly open-sourced DC/OS—the easiest way to get started deploying containers and other distributed systems on Apache Mesos.
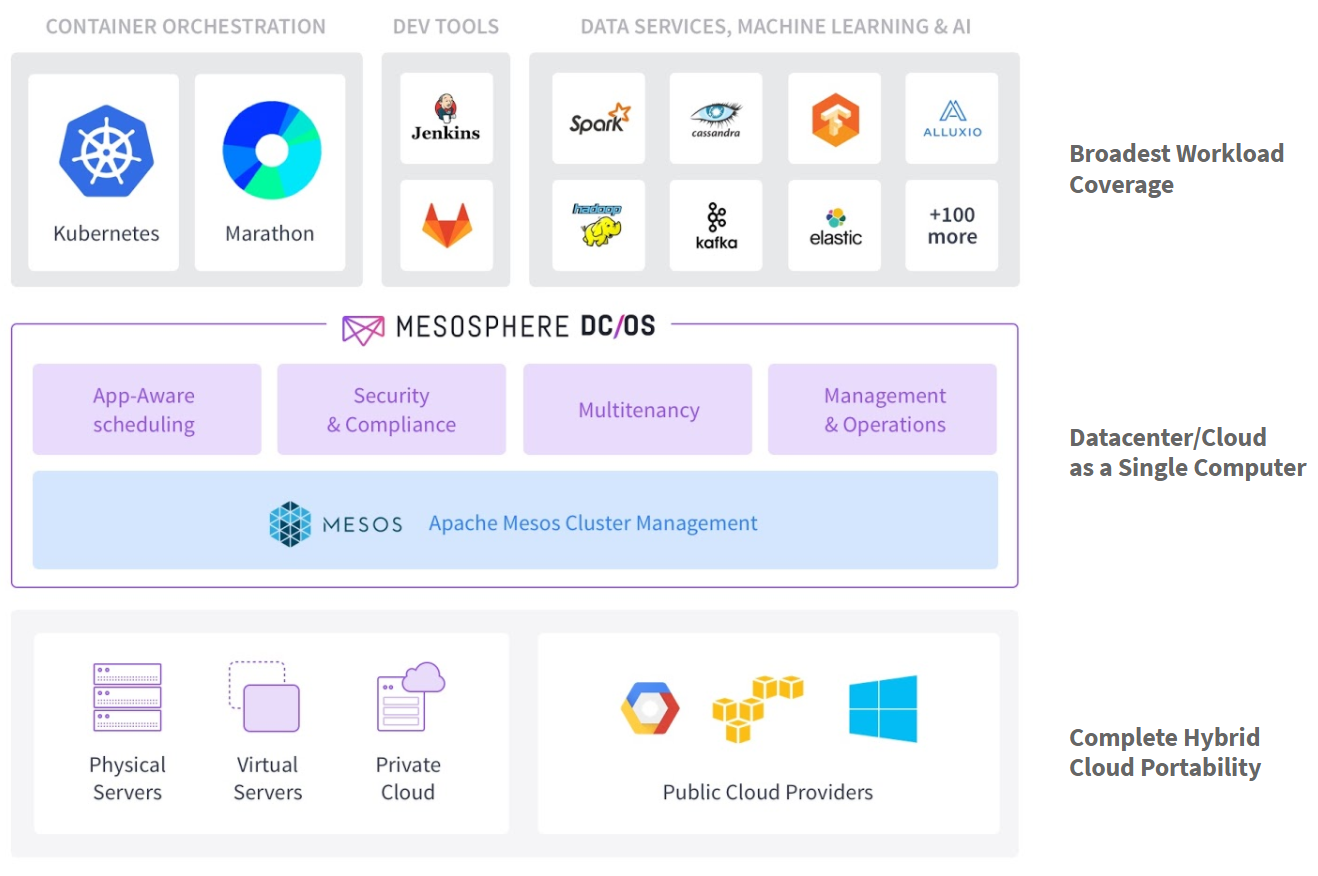
As a quick recap, DC/OS includes Apache Mesos and all of its core capabilities, as well as the following features:
- An easy installer: List the IP addresses of your nodes and a couple configuration options in our config.yaml file, and DC/OS will automatically bootstrap, install and validate a complete Mesos installation, with all the DC/OS components.
- Cluster-wide DNS: DC/OS makes all your frameworks, apps, services, and containers discoverable and addressable by DNS, so that you can spend less time figuring out service discovery and more time building great software.
- A container scheduling platform: DC/OS uses Marathon to launch, monitor, and heal your applications, so that a few (dozen) machine failures don't even cause a blip in your uptime.
- The DC/OS package universe: Ever wanted a 1-click installation to deploy and scale Cassandra, Kafka, Spark, or HAproxy edge routing? All these are available and fully open source through the DC/OS packaging system.
When we left off, we had just finished configuring our machines so that they can talk to each other. Now, we're going to jump in to installing DC/OS and launching our first scalable, load-balanced container!
Getting our bootstrap node ready to install
To start, we'll choose a machine to be the bootstrap node. I usually use the VM that launched first. Although today bootstrapping the bootstrap node is a manual process, this step should eventually be automated.
However, the installer does have a prerequisite—we need to have Docker up and running. Docker allows us to have a single DC/OS installer regardless of the distribution. To set up Docker on CentOS 7, we need to add the repository from which we'll install Docker; set up Docker's systemd config to use a production-quality storage driver; and install the Docker engine.
Add the Docker repo
sudo tee /etc/yum.repos.d/docker.repo <<-'EOF'
[dockerrepo]
name=Docker Repository
baseurl=https://yum.dockerproject.org/repo/main/centos/$releasever/
enabled=1
gpgcheck=1
gpgkey=https://yum.dockerproject.org/gpg
EOF
Set up the systemd config
sudo mkdir -p /etc/systemd/system/docker.service.d && sudo tee /etc/systemd/system/docker.service.d/override.conf <<- EOF
[Service]
ExecStart=
ExecStart=/usr/bin/docker daemon --storage-driver=overlay -H unix:///var/run/docker.sock
EOF
Install Docker
sudo systemctl daemon-reload
sudo systemctl stop docker
sudo yum install -y docker-engine
sudo systemctl start docker
sudo systemctl enable docker
Want to make sure it worked? Run sudo docker ps; if it doesn't complain about missing components, Docker is ready to go!
Luckily, the DC/OS installer will handle this installation (plus a dozen other configuration steps) for every node that's running Mesos.
Next, let's download the DC/OS installer onto the bootstrap node. Just run curl -O https://downloads.dcos.io/dcos/EarlyAccess/dcos_generate_config.sh to get it.
Writing our configuration
To use the DC/OS installer, we'll need to provide it with three files: SSH credentials to access all the nodes; a script to determine each node's primary internal cluster IP; and the YAML config with a couple important settings. These files will all be stored in the ~/genconf folder, assuming that you're running the DC/OS installer from ~.
For the SSH credentials, you can use the SSH key you provisioned your cluster with. We'll copy this into ~/genconf/ssh_key. Make sure to chmod 600 ~/genconf/ssh_key.
We'll copy the script to determine the node's IP into ~/genconf/ip-detect. You can use this for any AWS VPC:
#!/bin/sh
# Example ip-detect script using an external authority
# Uses the AWS Metadata Service to get the node's internal
# ipv4 address
curl -fsSL http://169.254.169.254/latest/meta-data/local-ipv4
For other environments, refer to the DC/OS documentation for guidance.
Lastly, we'll write the config file, which will be stored in ~/genconf/config.yaml. Here's the config file I used; you'll just need to provide your own IP addresses for your masters and agents. You can find those IP addresses from the AWS console, under your EC2 Instances.
---
agent_list:
- 10.0.0.1
- 10.0.0.2
master_list:
- 10.0.0.4
- 10.0.0.5
- 10.0.0.6
bootstrap_url: file:///opt/dcos_install_tmp
cluster_name: DCOS
exhibitor_storage_backend: static
master_discovery: static
process_timeout: 10000
resolvers:
- 169.254.169.253
ssh_port: 22
ssh_user: centos
roles: slave_public
weights: slave_public=1
Notice that I left off one agent. We'll come back to that in a little while. That agent requires a bit of extra work so that it can load balance to the public internet.
The fun part
At last, we can run the installer. Make sure you've made the installer executable: chmod +x dcos_generate_config.sh. First, we'll have DC/OS combine those three files we just wrote into an executable installer image. This is as easy as running:
sudo ./dcos_generate_config.sh --genconf
Don't be worried if this takes a long time—it can take anywhere from 30 seconds to a few minutes, depending on the machine you're running it on. Once the command completes, you'll notice that we have a new installation package located at ~/genconf/serve/. This is what we would copy to all our nodes to run locally in the advanced installer. Luckily for us, DC/OS automates this step.
Next, we need to prepare all the nodes for DC/OS by installing Docker, configuring SELinux and doing a dozen other things you're sure to forget. To automatically prepare all the nodes, just run this:
sudo ./dcos_generate_config.sh --install-prereqs
Now, all the nodes are configured perfectly, we hope. How can we check? Just run:
sudo ./dcos_generate_config.sh --preflight
preflight shouldn't find any issues, and so we can move on to deploying. Not surprisingly, the command to deploy is:
sudo ./dcos_generate_config.sh --deploy
To validate that the deploy succeeded, we'll run the postflight checks, which is as easy as:
sudo ./dcos_generate_config.sh --postflight
You now have a working installation of DC/OS!
Check out our new toys
To log into DC/OS, we need to visit one of the master nodes from our browser. Remind yourself the cluster IP of a master by looking into ~/genconf/config.yaml on the bootstrap node. Then, you can find the public IP of that node through the EC2 dashboard, by clicking on a master and looking at the second row in the right column.
Since we added our IP address to the security group, you should be able to visit the public IP of a master from your browser, and you'll be directed to the DC/OS login page.
The very first login you make will become the cluster's first admin account. I like to log in with my GitHub identity. Other users can easily be added once you've logged in.
Now, you can see your Mesos cluster humming along—way easier than installing all 28 of those components manually!
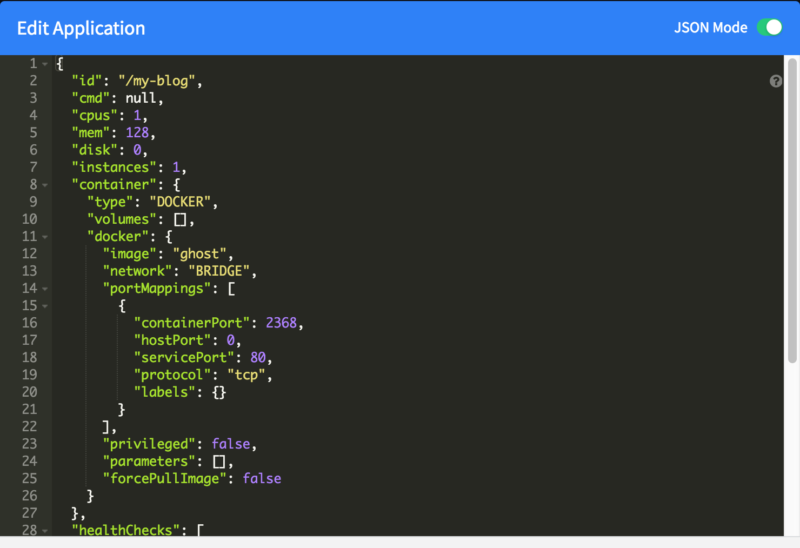
Let's try launching a container on the cluster. Go to the Marathon service and click to open its control panel. We'll start by launching Ghost, a blog platform. Click to add a new application, which we'll call my-blog.
We'll just add the Docker image name (ghost), and we'll use bridged networking.
We'll expose the container port 2368 (Ghost's default) to whatever host port we happen to be assigned.
Lastly, we'll add a health check on the blog's root.
Wait until you see my-blog as healthy and running in the Marathon UI.
At this point, we've managed to launch a scalable, reliable cluster powered by Mesos much more easily than ever before! But I promised that we'd expose our application to the internet, and we still haven't installed the load balancer.
Adding an internet-facing HAproxy load balancer
Remember that last node we haven't configured yet? It's time to turn that into our first service load balancer. Let's start by installing the prereqs onto it. Go to your ~/genconf/config.yaml on the bootstrap node, and add the final node's IP address to the list of agents. This time, however, we'll only going to run
sudo ./dcos_generate_config.sh --install-prereqs
sudo ./dcos_generate_config.sh --preflight
You can ignore errors from the existing agents and masters—DC/OS is just telling you it's already installed, and you probably don't want to clobber that installation in-place.
In order to make this new node come up with the right configuration to be a load-balancing proxy (of course, it can still host other containers if there's space), we're going to use the manual installation process. To do this, copy the contents of the folder ~/genconf/serve/ on the bootstrap node into /opt/dcos_install_tmp/ on the last node.
If you need some help accomplishing this, try the following commands. First, on the bootstrap node, run:
scp -r -i genconf/ssh_key genconf/serve $LAST_NODE_IP:~
Then, on, on the last node:
sudo mkdir /opt/dcos_install_tmp
sudo cp serve/* /opt/dcos_install_tmp/
Finally, we can run the installer on the last node:
cd /opt/dcos_install_tmp/
sudo ./dcos_install.sh slave_public
We're copying files because DC/OS does not yet pass arguments to the dcos_install.sh from the CLI.
For good measure, validate that the installation was successful, by running sudo ./dcos_generate_config.sh --postflight on the bootstrap node.
Now comes the easy part. Just go to the Universe tab of the DC/OS UI, search for marathon-lb, and click install.
To serve our app to the internet on port 80, we'll simply go back to our Marathon app and edit the configuration. First, we'll add the label so that the load balancer exposes the container externally. You can do that by clicking on the Labels menu, and adding the "HAPROXY_GROUP: external" label.
To set the port this service will use on the load balancer, we'll drop to JSON mode this time. To do this, click the switch on the upper right of the config editor. Then, just add the servicePort as 80, as shown in the portMappings section.
Now, if you visit the public IP of that last node, you'll see our blog pop up! Here's why this is so cool:
- Every node you configure as a slave_public is going to be running the HAProxy load balancer.
- Every time a new container is started or crashes, if it has the metadata I mentioned above in Marathon, every single load balancer will have the change pushed to it and will respect the latest changes in milliseconds
This kind of reactive, push-based container load-balancing usually requires a serious investment in talent and technology to pull off.
Of course, many services shouldn't be exposed externally. If you specify a servicePort of 80 or 443, marathon-lb will serve those publicly. By convention, a servicePort of 10000-10100 is meant for internal services, so that you can easily adapt your existing networked Docker applications to have instantly reactive load balancing and service discovery for free.
Next steps
At this point, you've seen how easy it is to use Mesos with the fully open source DC/OS. We installed DC/OS; started a container; installed a package through the DC/OS package manager for Mesos; and connected it to a high-performance load-balancing and service-discovery solution.
There's so much more to DC/OS, and we're just getting started. Here's some ideas for next steps you can take:
- Install the DC/OS command line: If you're like me, you prefer the command line. All of DC/OS's distributed functionality is available through the dcos command line interface, including debugging containers across your cluster!
- Install a database: One major advantage of DC/OS over other container orchestrations technologies is that it can manage high performance databases that store data locally. Why not install Cassandra? It's literally just one click from the package manager, see this tutorial.
- Take DC/OS to production: Check out these tutorials to learn about connecting your load balancing nodes to public DNS and set up automatic recovery for lost agents and masters.
Remember, if you need more information you can get everything you'll need on the DC/OS website, in its documentation and via its GitHub organization. And stay tuned for Part 3 of this series to learn about running existing applications such as Cassandra and KairosDB on DC/OS.