
Sep 24, 2019
Nick Jones
D2iQ

23 min read
Nearly a year ago we announced a new open-source project called KUDO - the Kubernetes Universal Declarative Operator. It’s a toolkit for developing Kubernetes Operators, but instead of maintaining a complex codebase with tens of thousands of lines of code, KUDO lets you accomplish the same thing declaratively in just a few lines of YAML. It provides a consistent set of conventions for lifecycle operations inspired by the DC/OS Commons SDK, and is borne from experience running distributed stateful applications at scale, in production, with a focus on Day 2 Operations.
Although it’s squarely aimed at solving the problems associated with running stateful applications on Kubernetes, it can be used for any application you want to run on your cluster - from a simple cleanup job through to production-ready installations of services such as Apache Kafka.
This post provides a hands-on introduction to KUDO, now a year into its development, from an operator developer’s perspective as well as from the viewpoint of someone responsible for deploying and managing such services on an existing cluster.
Stateful applications on Kubernetes
Container orchestration engines (COEs) such as Kubernetes work with the concept of a declarative state, in which you define an object such as a service, specify some parameters, and the COE takes care of the rest, reconciling your request and ensuring it’s adhered to. This is designed for stateless applications, and for this purpose it works perfectly. This class of application is binary - either it’s on or off - and ephemeral. They don’t need to persist any data to disk or across the network, nor do they need to share state information with other instances of the application.
This approach has helped cement the microservices architecture pattern, with applications running in containers, popping into and out of existence in order to meet the demands of capacity and resilience. Stateless applications function happily within the parameters of this paradigm, the COE handling the where and the why of the workload.
This environment can be hostile to a second class of applications - stateful workloads. A fundamental aspect of the Kubernetes scheduler is that it can move Pods around as it sees fit, but stateful applications do not appreciate having their paths to disk or network changed during operation, at least not without an often complex sequence of actions necessary to safeguard data consistency and service availability. Not only that, the sequence of actions for standard tasks such as deployment and scaling are completely different depending on the service - the process for these things for Kafka is different to Cassandra or a HDFS deployment, for example.
StatefulSets
To handle the challenges of running stateful applications, Kubernetes introduced StatefulSets, providing features such as consistent and unique identifiers for networking and for storage, as well as constraints that guarantee uniqueness and ordering of certain operations such as those related to deployment and scaling.
However, they’re far from a panacea; StatefulSets are generic, with the StatefulSet controller having no insight or visibility into what’s going on in the pods themselves. As a result, operational actions are coarse, and while ordering can be defined it cannot properly handle specifics such as being able to acknowledge aspects such as replication state, cluster state, and so on, let alone take action based on their status. The fact that stateful applications are almost all unique in these strategies further compounds this problem.
Enter Kubernetes Operators.
Operators
Kubernetes by design is highly modular, with discrete infrastructure components known as controllers encapsulating logic related to objects such as ReplicaSets and DaemonSets being managed by replica-controller and daemon-controller respectively. The flexibility and extensibility of Kubernetes is one of its greatest strengths, and it’s possible - with the right smarts - to build on the base functionality by writing custom controllers, surfacing new functionality via custom resource definitions (CRDs). Together, these two features have fuelled a new pattern which solves the above problem related to managing and orchestrating stateful applications - Kubernetes Operators.
A Kubernetes Operator is comprised of a custom controller, one which contains the operational knowledge required to manage our particular operation, as well as a set of CRDs that give us the API primitives to interact with instances of our application running on the cluster. This means that application administrators do not have to fight or second guess our COE, and can instead entrust the nuances of complex operational actions to the logic encoded within the operator’s controller.
This successful pattern has spawned many Kubernetes Operators implementations, making life as an infrastructure or application administrator for services hosted on Kubernetes much, much simpler. However, what if you want to write your own? What if the Operator you’re using doesn’t provide all of the features or the coverage you need? Because of the complexity involved in making sure Operators are production ready, having to handle all edge-cases as well as comprehensive testing, it means that these can be significant software engineering undertakings. For example, the official Elastic operator is over 50,000 lines of code. A lot of organizations simply don’t have the resources to commit to this kind of endeavour.
The second problem with this proliferation of Operator implementations is that lack of consistency. Each Operator is unique, with a different take on how an administrator might interact with its CRDs.
Thirdly, the rate of change and the pace with which the Kubernetes project is being developed and released is nothing short of breathtaking. In turn this means that Operator developers have their work cut out keeping on top of these latest developments, further exacerbating the engineering effort required when this is performed in-house.
To help solve all of the above, KUDO was born.
Introducing KUDO
Instead of developing an Operator from scratch, KUDO provides a standard approach and lets the users focus on higher-level coordination of infrastructure and application resources.
KUDO Concepts
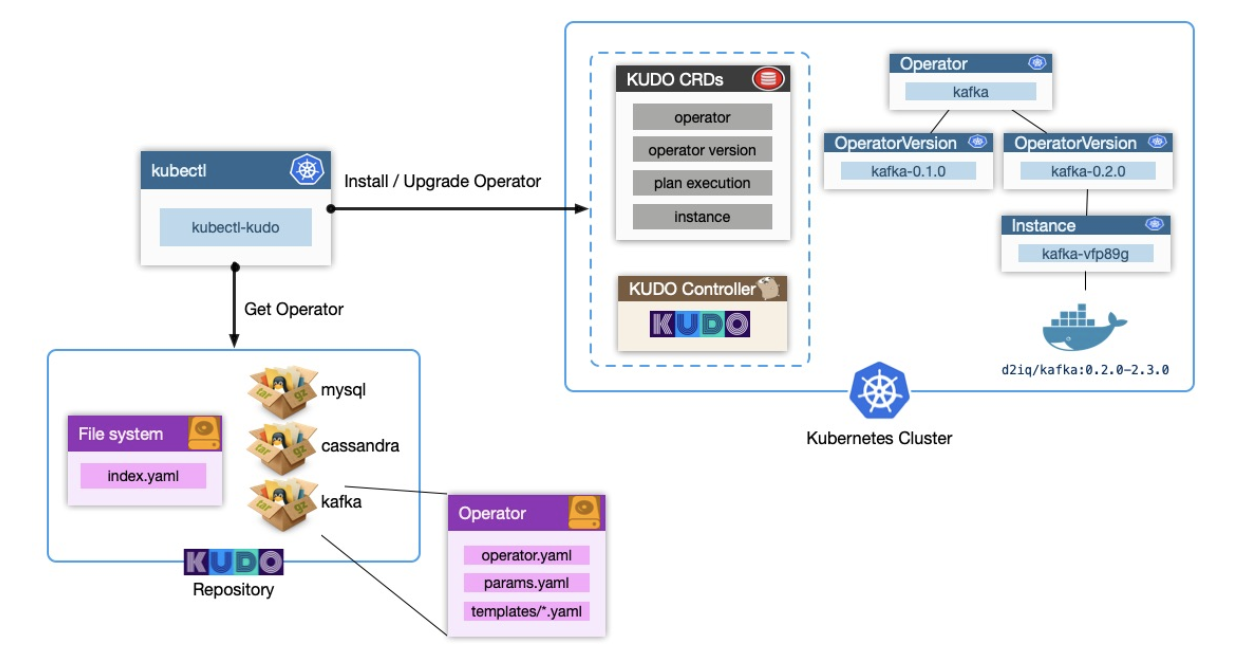
KUDO is comprised of a handful of components - a universal controller, a set of CRDs, and the KUDO CLI. The first two are things which are deployed to an existing Kubernetes cluster, and the CLI component makes it easy to install Operators from various sources. These KUDO Operators provide KUDO with everything it needs to become an Kubernetes Operator on behalf of our application or service; In this regard you can consider KUDO to be a ‘meta-operator’. Here’s how the different components hang together:
Before diving into some specific examples, we’ll explore some of the concepts that KUDO introduces, firstly through its CRDs.
Plans
Plans are KUDO’s way of encapsulating a given operational task. These as analogous to ‘runbooks’. They provide consistency for how an application is managed across its entire operational lifecycle. To promote composition and re-usability, Plans are structured in a specific way - they’re made up of Phases, and Phases in turn contain Steps. KUDO lets you specify either a serial or parallel strategy for Phases and Tasks. For example, when deploying a ZooKeeper cluster you can bring up all Pods in your cluster in parallel and they’ll eventually converge. With Kafka, Brokers running in Pods need to be created serially, waiting for a liveness condition before moving on to the next one.
Operator and OperatorVersion CRDs
A KUDO Operator is a high level description of a deployable service. As mentioned above, this can be something as simple as a batch job that you need to manage, or a service as complex as a distributed stateful application, such as Apache Cassandra or Apache Kafka.
An OperatorVersion is the implementation of an Operator. It’s via this CRD that a KUDO Operator developer can use to furnish KUDO with everything it needs to know to become an Operator for an application on the user's behalf. The OperatorVersion contains all of the templated resources for things like StatefulSets, PodDisruptionBudgets, PersistentVolumeClaims, and so on.
A given KUDO Operator can have multiple OperatorVersions. This means KUDO has the capability to capture and contain operational specifics, in a way that doesn’t cause conflict even when there are numerous Instances across differing versions. Consider for example the process of taking a backup of existing data; The approach for this might change between a particular release of the application, but the nuances of this can be captured in a given OperatorVersion. An administrator can trigger a backup against any supported version, knowing that the underlying KUDO Operator will do the right thing.
Instance CRD
The KUDO Instance CRD represent an actual instantiation of an application, and is tied to the OperatorVersion. Once an Instance is created, KUDO handles running through the relevant phases of the Operator’s Plan which by default is the ‘Deploy’ action.
You can create multiple instances of your application via the Instance CRD, and combined with the ability to have multiple OperatorVersions this gives administrators a worry-free way of running a mix across versions without causing problems with application automation and operation.
Deploying and managing a service using KUDO
To tie the above together, we’ll install KUDO along with an Operator to our Kubernetes Cluster. For the purposes of this example I’m using a cluster deployed using Konvoy, but you can use something like KinD or Minikube if you want to test locally.
Deploying KUDO to your cluster
The first step is to install the KUDO CLI. While KUDO is just Kubernetes - there’s no proprietary API and no DSL to learn - the KUDO CLI kubectl extension makes life a lot easier when interacting with the CRDs that KUDO provides. To get the CLI installed, you can either use Homebrew, grab a binary of the latest release, or install from source. In my example I’m using macOS and so I can just install via brew:
Note: For the examples below, output prefixed with $ denotes my shell prompt and shows example output. Sections without a $ can be copy-and-pasted verbatim.
brew tap kudobuilder/tapbrew install kudo-cli
Now I have a kubectl-kudo binary in my $PATH and I can run the kubectl kudo subcommand:
$ kubectl kudo --versionkubectl-kudo version 0.6.0
With those pre-requisites in place, I can now use the kubectl kudo init command to deploy the KUDO controller along with CRDs and other required objects to my cluster, and verify that these are in place:
$ kubectl kudo init$KUDO_HOME has been configured at /Users/nick/.kudo$ kubectl api-resources --api-group kudo.devNAME SHORTNAMES APIGROUP NAMESPACED KINDinstances kudo.dev true Instanceoperators kudo.dev true Operatoroperatorversions kudo.dev true OperatorVersionplanexecutions kudo.dev true PlanExecution$ kubectl get pods -n kudo-systemNAME READY STATUS RESTARTS AGEkudo-controller-manager-0 1/1 Running 0 23m
Installing the ZooKeeper KUDO Operator
At this point we can interact with the KUDO CRDs as described above. There are no Operators installed, so let’s rectify that by installing the KUDO ZooKeeper Operator:
$ kubectl get operatorsNo resources found.$ kubectl get instancesNo resources found.$ kubectl kudo install zookeeper --instance zkoperator.kudo.dev/v1alpha1/zookeeper createdoperatorversion.kudo.dev/v1alpha1/zookeeper-0.1.0 createdinstance.kudo.dev/v1alpha1/zk created$ kubectl get podsNAME READY STATUS RESTARTS AGEzk-zookeeper-0 0/1 ContainerCreating 0 3szk-zookeeper-1 0/1 ContainerCreating 0 3szk-zookeeper-2 0/1 ContainerCreating 0 3s# And then after a minute or so, depending on your network connection...$ kubectl get podsNAME READY STATUS RESTARTS AGEzk-zookeeper-0 1/1 Running 0 54szk-zookeeper-1 1/1 Running 0 54szk-zookeeper-2 1/1 Running 0 54s
At that point we have a working ZooKeeper cluster. Magic! 💫
Let’s break down exactly what happened, as the kubectl kudo install zookeeper --instance zk command does a few things for us:
- install handles installing the ZooKeeper Operator (if it’s not already) from the KUDO Operator community repository;
- By default, an install triggers the deploy plan which in turn creates our Instance (of ZooKeeper). Note that this can be skipped via the --skip-instance option;
- KUDO handles creating a 3-node ZooKeeper cluster for us. A 3-node cluster is the default, so there’s nothing else we need to specify here;
- The --instance zk option allows us to name our Instance. All Instances must have a unique name; If we don’t specify one then KUDO will automatically create a unique one for us on our behalf, but to make things easier during this demo I chose to name it myself.
The other thing to note is that all three ZooKeeper pods popped into existence at the same time. That’s because the associated strategy for the deploy phase is set to parallel.
To further verify our ZooKeeper instance, we can run a few more commands such as:
$ kubectl get instancesNAME AGEzk 9m18s$ kubectl kudo plan status --instance zkPlan(s) for "zk" in namespace "default":.└── zk (Operator-Version: "zookeeper-0.1.0" Active-Plan: "zk-deploy-554891141") ├── Plan deploy (serial strategy) [COMPLETE] │ ├── Phase zookeeper (parallel strategy) [COMPLETE] │ │ └── Step everything (COMPLETE) │ └── Phase validation (parallel strategy) [COMPLETE] │ └── Step validation (COMPLETE) └── Plan validation (serial strategy) [NOT ACTIVE] └── Phase connection (parallel strategy) [NOT ACTIVE] └── Step connection (parallel strategy) [NOT ACTIVE] └── connection [NOT ACTIVE]$ kubectl get events --field-selector involvedObject.name=zkLAST SEEN TYPE REASON OBJECT MESSAGE37m Normal CreatePlanExecution instance/zk Creating "deploy" planExecution execution37m Normal PlanCreated instance/zk PlanExecution "zk-deploy-554891141" created36m Normal PlanComplete instance/zk PlanExecution zk-deploy-554891141 completed
The second command shows how the KUDO CLI can interpret and format the output from the Kubernetes APIs in a way that’s a little more user-friendly.
Installing the Apache Kafka KUDO Operator
With ZooKeeper deployed we can turn our attention to getting Kafka up and running. As with ZooKeeper, KUDO makes this very easy:
$ kubectl kudo install kafka --instance=kafka -p BROKER_MEM=1024moperator.kudo.dev/v1alpha1/kafka createdoperatorversion.kudo.dev/v1alpha1/kafka-0.2.0 createdinstance.kudo.dev/v1alpha1/kafka created$ kubectl get podsNAME READY STATUS RESTARTS AGEkafka-kafka-0 0/1 ContainerCreating 0 4s# [..]$ kubectl get podsNAME READY STATUS RESTARTS AGEkafka-kafka-0 1/1 Running 0 39skafka-kafka-1 1/1 ContainerCreating 0 18s# [..]$ kubectl get podsNAME READY STATUS RESTARTS AGEkafka-kafka-0 1/1 Running 0 96skafka-kafka-1 1/1 Running 0 75skafka-kafka-2 1/1 Running 0 58s# [..]
Here we’re doing something a little different; We’re overriding one of the default parameters - BROKER_MEM - and lowering the value to 1024Mb. The other thing I’ve tried to show in the above output is that the Kafka deployment plan has a different strategy - serial - and so KUDO takes care of deploying each broker’s Pod in turn.
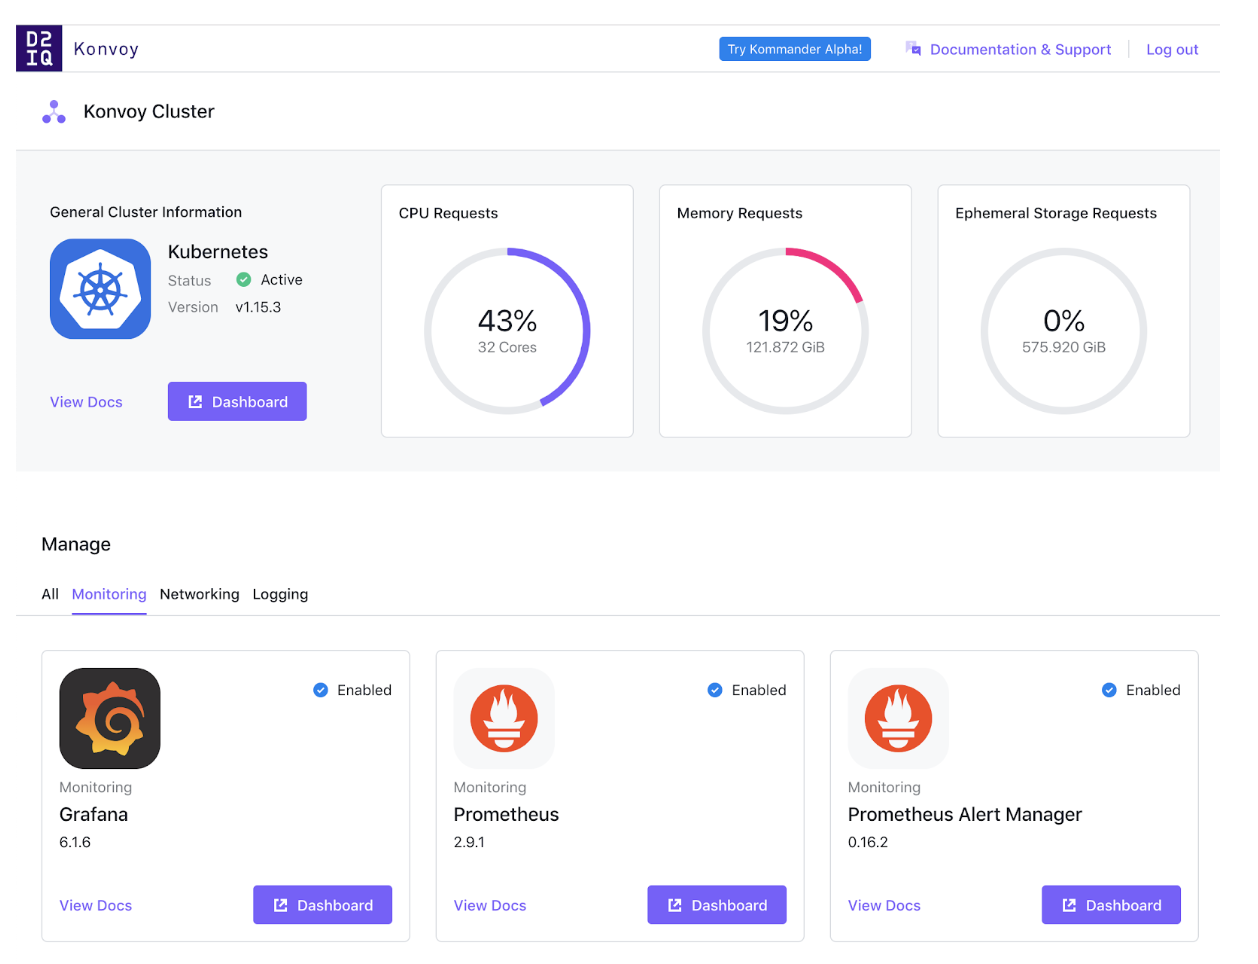
I’m now going to generate some load for my Kafka cluster, and I’ll keep an eye on resource usage via Grafana. Konvoy comes with everything you need for monitoring Kubernetes itself as well as the services you’ve deployed, so in my case it’s as easy as clicking on the Grafana ‘Dashboard’ button in Konvoy’s portal:
To surface metrics from Kafka we’ll need to perform a couple of additional steps. We’ll add a ServiceMonitor object via the Prometheus Operator:
$ kubectl apply -f - << EOFheredoc> apiVersion: monitoring.coreos.com/v1kind: ServiceMonitormetadata: labels: app: prometheus-operator release: prometheus-kubeaddons name: kafka-cluster-monitorspec: endpoints: - interval: 30s port: metrics selector: matchLabels: kudo.dev/servicemonitor: "true"heredoc> EOFservicemonitor.monitoring.coreos.com/kafka-cluster-monitor created
NB: The Prometheus Operator is pre-installed on Konvoy clusters; If you’re deploying to another Kubernetes cluster then you’ll first need to install this operator yourself to gather information from the monitoring endpoint that our KUDO Kafka Operator makes available by default).
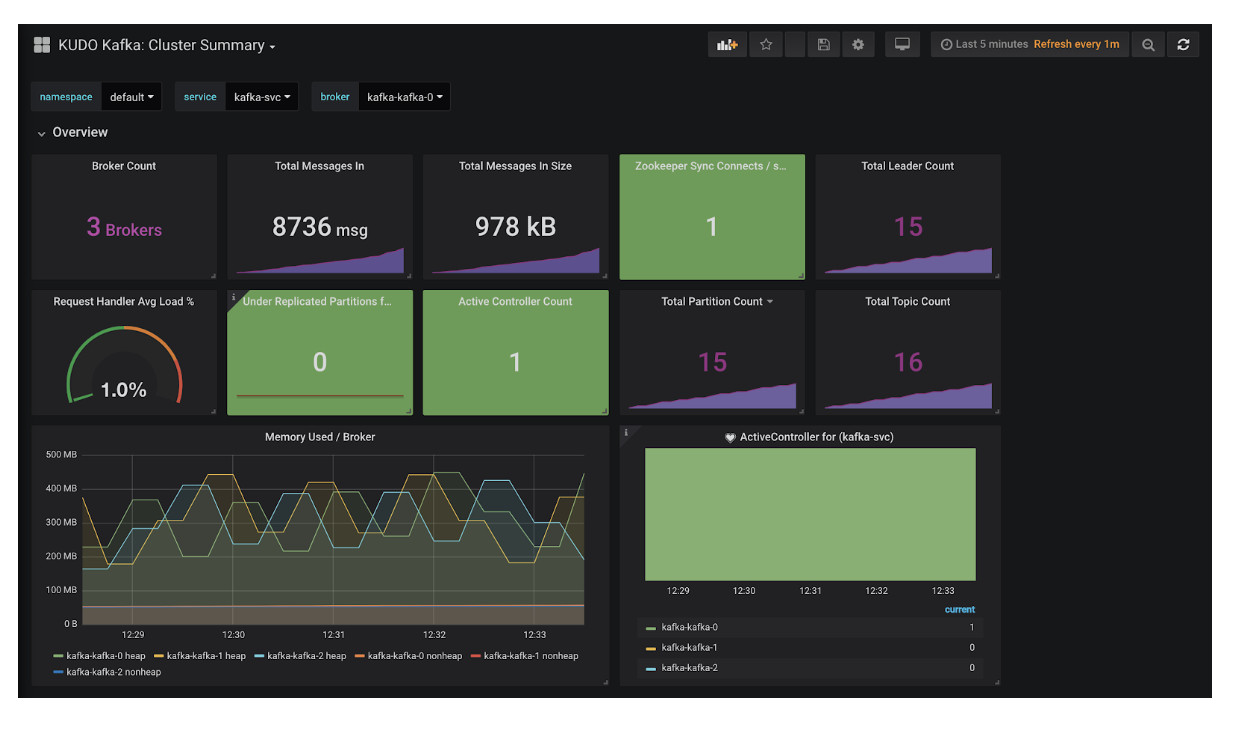
Now I can install the custom Kafka dashboard - which is provided with the KUDO Kafka Operator - and get some insight into my cluster:
Now let’s scale the deployment by upping the broker count and allocating more memory at the same time:
$ kubectl kudo update --instance kafka -p BROKER_MEM=4096m -p BROKER_COUNT=5Instance kafka was updated.$ kubectl describe instance kafka | grep -A5 SpecSpec: Operator Version: Name: kafka-0.2.0 Parameters: BROKER_COUNT: 5 BROKER_MEM: 4096m$ kubectl get pods | grep kafkakafka-kafka-0 1/1 Running 0 13mkafka-kafka-1 1/1 Running 0 13mkafka-kafka-2 1/1 Running 0 12mkafka-kafka-3 0/1 Pending 0 64s# [..]kafka-kafka-0 1/1 Running 0 30mkafka-kafka-1 1/1 Running 0 30mkafka-kafka-2 0/1 ContainerCreating 0 10skafka-kafka-3 1/1 Running 0 18mkafka-kafka-4 1/1 Running 0 55s
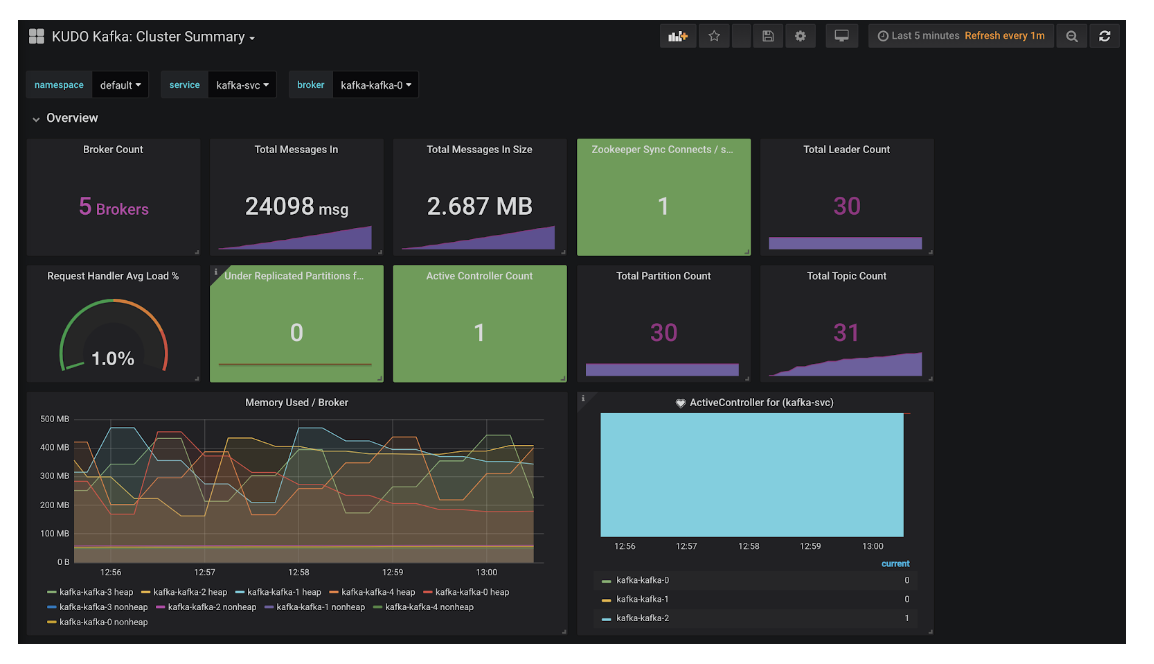
Before long, KUDO will have taken care of adding in the additional brokers and also restarting those that have had their Pod memory allocation changed. Now if I look at my Grafana dashboard I can see I have five active brokers in my cluster:
Developing a KUDO Operator
As demonstrated, using KUDO to deploy and manage applications via Operators is straightforward. It’s also consistent; Application and infrastructure administrators can use the same process regardless of what service it is they need to manage.
But what about developing a KUDO Operator? This too is straightforward; Let’s look at a simple example - the
MySQL Operator - to understand what’s involved.
KUDO Operators have a simple folder structure:
$ pwd/Users/nick/src/kudo-mysql-operator/operator$ tree.├── operator.yaml├── params.yaml└── templates ├── backup-pv.yaml ├── backup.yaml ├── init.yaml ├── mysql.yaml ├── param.yaml └── restore.yaml
At the root of the Operator folder we have two files - operator.yaml and params.yaml, and then a templates subdirectory with any templated YAML files we want to reference from our Plans. Plans are composed as follows:
Plan foo├─ Phase bar│ ├─ Step qux│ └─ Step quux└─ Phase baz ├─ Step quuz ├─ Step corge └─ Step grault
So a Plan can have multiple Phases, and each Phase has a set of associated Steps. For a given Step we define tasks, and these reference our templated YAML files that hold our Kubernetes objects. When KUDO executes a plan, it compiles all of this taking into consideration strategy and rendering any templated parameters. Looking at a section of the operator.yaml for the MySQL Operator:
plans: deploy: strategy: serial phases: - name: deploy strategy: serial steps: - name: deploy tasks: - deploy - name: init tasks: - init - name: cleanup tasks: - init delete: true
Our deploy Plan has a single phase, also called deploy, and that references a series of steps - deploy, init, and cleanup. If we example the tasks section further up in the file:
tasks: deploy: resources: - mysql.yaml init: resources: - init.yaml
The deploy task has a single resource listed, mysql.yaml, and init also has a single resource associated with it - init.yaml. The contents of these files should be familiar to anyone who has run services on Kubernetes, for example mysql.yaml contains three objects - a Service definition, a PersistentVolumeClaim, and also a Deployment which defines our MySQL container.
What about the parameters in these template files? This is where params.yaml comes in. This basic MySQL Operator only has a couple of these defined:
BACKUP_FILE: description: "Filename to save the backups to" default: "backup.sql" displayName: "BackupFile" trigger: backupPASSWORD: default: "password"
These are then used in the resource templates themselves like so, this is from the backup.yaml resource template:
apiVersion: batch/v1kind: Jobmetadata: namespace: default name: {{ .PlanName }}-jobspec: template: metadata: name: {{ .PlanName }}-job spec: restartPolicy: OnFailure containers: - name: bb image: mysql:5.7 imagePullPolicy: IfNotPresent command: - /bin/sh - -c - "mysqldump -u root -h {{ .Name }}-mysql -p{{ .Params.PASSWORD }} kudo > /backups/{{ .Params.BACKUP_FILE }}" volumeMounts: - name: backup-pv mountPath: /backups volumes: - name: backup-pv persistentVolumeClaim: claimName: {{ .Name }}-backup-pvKUDO uses Go templating along with Sprig to provide various functions, which provides a lot of flexibility in how templated values are derived whilst keeping things simple.
The MySQL operator is intended as a proof-of-concept only and so is far from feature-complete. For a much more comprehensive example, take a look at the KUDO Kafka Operator.
There’s also an excellent step-by-step guide to building your own KUDO Operator, taking ElasticSearch as an example, available here.
KUDO's Community and its Future
KUDO is first and foremost an open-source, community-led project. All development is done in the open, with discussion happening in the #kudo channel on the Kubernetes Slack and development in related repos on GitHub. If you’re interested in contributing, now’s a great time to do so - there’s a ton of areas in which you can help, and as KUDO itself is going through the application process to be a CNCF Sandbox project then you could help to be a part of its journey.
Although it’s early days for KUDO as a project, it’s already comprehensive enough to be able to build production-ready Operators. There are a lot of exciting features on the roadmap which will help to accelerate its adoption and ignite the wider Cloud Native community’s interests. Some of these include:
- Being able to extend Helm charts and Cloud Native Application Bundles (CNAB) with orchestration provided by KUDO;
- Dynamic CRDs - giving infrastructure and application administrators a way of extending or adding operational functionality to an existing KUDO Operator, without having to install a new version;
- Operator extensions - instead of having to fork and maintain upstream Operators, the extensions mechanism would give administrators a simple way of adding or amending existing functionality, without introducing the burden of maintenance;
- Operator dependencies - this covers dependencies on existing instances (so in the Kafka and ZooKeeper example above, the latter would be automatically required and installed by the former as a dependency), through to being able to build comprehensive pipelines which consume the outputs of previous phases;
- An Operator Toolkit, making development of KUDO Operators that bit easier. This will include features such as ‘skeleton’ template generation, linting, and so on.
If you’re interested in giving KUDO a spin then the website has a getting started guide to set you off in the right direction, and feel free to swing by via the Slack channel for any questions or if you’ve any feedback - we’d love to hear from you and get your suggestions on the KUDO roadmap!