
May 21, 2015
D2iQ
D2iQ

6 min read
This is a guest post from Kai Davenport at ClusterHQ.
NOTE: ClusterHQ has published a more up-to-date version of this demo that uses the official Docker plugin instead of Powerstrip.
The amazing app you just published is gaining traction and the post to Hacker News last week hit home -- you've seen a 400 percent increase in average load!
Clearly, your MongoDB server needs more resources because it's becoming a bottleneck in your stack. Because you wanted to keep costs down, your Mesos cluster is made up from low-power machines, but you decide to add some much more-powerful hardware and faster disks. Because you deployed your database inside a Docker container using Marathon, it is simple to reschedule the container onto a machine with more-powerful hardware.
The problem
When we move the database container, we need a way to migrate the data also. This is essential, lest users become unhappy because their data was left on the old machine. We also need to minimize the downtime required to make this migration happen.
The solution
Using Powerstrip, we can use the Flocker local-storage migration feature to move the data to a new server. This means we are treating the container and the data as an atomic unit -- when Marathon reschedules the container to another machine, Flocker moves the data alongside it.
We could use MongoDB sharding to eliminate some of this problem in the future, but because we started out with m1.small machines on Amazon Web Services and need to upgrade to c3.xlarge machines with SSDs, we need a way to migrate the data whatever we do.
Demonstration
Our demo is a Backbone version of the classic TodoMVC application. It is plugged into a node.js TodoMVCBackend, which saves its data inside a MongoDB container.
We have added attributes to the two Mesos slaves -- disk=spinning and disk=ssd-- to represent the types of disk they have. The Mongo container is first allocated onto the node with the spinning disk and then migrated (along with its data) onto the node with an SSD drive.
Before migration
[caption id="attachment_1766" align="aligncenter" width="532"][
]10 Figure 1: Node.js container accessing Mongo container on node 1[/caption]
After migration
[caption id="attachment_1767" align="aligncenter" width="530"][
]11 Figure 2: MongoDB container and data volume migrated to node 2[/caption]
The roles of Mesos and Marathon
Mesos plays the role of a kernel for accessing hardware resources in a cluster of machines. It can offer resources to registered frameworks, which will schedule jobs onto machines and invoke the framework's executor on the chosen machine to run the job.
Marathon plays the role of a cluster-wide init and control system. It runs as a Mesos framework and presents a REST API that can be used to deploy long-running Docker containers across the cluster.
Installation
First you need to install:
We'll use Virtualbox to supply the virtual machines that our Mesosphere cluster will run on. We'll use Vagrant to simulate our application stack locally. You could also run this demo on AWS or Rackspace with minimal modifications.
Step 1: Start VMs
The first step is to clone this repo and start the three VMs:
$ git clone https://github.com/binocarlos/powerstrip-mesosphere-demo
$ cd powerstrip-mesosphere-demo
$ vagrant up
Step 2: Open Marathon/Mesos GUI
Now, we open the Marathon GUI so we can monitor our deployment. Open a web browser and point it to this URL:
http://172.16.255.250:8080
[caption id="attachment_1771" align="aligncenter" width="600"][
]15 Figure 3: The Marathon web GUI before deployment[/caption]
We can also open the Mesos GUI to monitor the underlying resource usage. Open another web browser and point it to this URL:
http://172.16.255.250:5050
[caption id="attachment_1776" align="aligncenter" width="600"][
]15 Figure 4: The Mesos web GUI before deployment[/caption]
Step 3: Deploy the MongoDB container
First, we deploy our MongoDB container to Marathon using the example/todomvc/db.json config. This will schedule the container onto the host with the spinning disk:
$ cat example/todomvc/db.json \ | curl -i -H 'Content-type: application/json' -d @- http://172.16.255.250:8080/v2/apps
Step 4: Deploy the node.js container
Then, we deploy our app container to Marathon using the example/todomvc/app.json config:
$ cat example/todomvc/app.json \ | curl -i -H 'Content-type: application/json' -d @- http://172.16.255.250:8080/v2/apps
Step 5: Check deployment
The Marathon GUI should display the 2 deployments.
[caption id="attachment_1777" align="aligncenter" width="600"][
]16 Figure 5: The Marathon web GUI after deployment[/caption]
We can also check the status by using the REST API:
$ curl http://172.16.255.250:8080/v2/tasks
Step 6: Add some data
Next, open the application in a browser and add some todo entries. Once you have typed an entry press Enter to submit it to the database:
http://172.16.255.251:8000/
[caption id="attachment_1778" align="aligncenter" width="600"][
]17 Figure 6: The todoMVC application[/caption]
Step 7: Stop the MongoDB container
Now, we stop the MongoDB container in preparation for moving it to node2:
$ curl -X "DELETE" http://172.16.255.250:8080/v2/apps/mongo
Step 8: Re-deploy the MongoDB container
Next, we use the same deployment file but replace the constraint so the Mongo container is scheduled onto the node with the SSD disk:
$ cat example/todomvc/db.json \ | sed 's/spinning/ssd/' \ | curl -i -H 'Content-type: application/json' -d @- http://172.16.255.250:8080/v2/apps
Step 9: Check deployment
Now we have moved the Mongo container; lets check the Marathon GUI for the deployment status.
[caption id="attachment_1779" align="aligncenter" width="600"][
]18 Figure 7: The Marathon web GUI after the 2nd deployment[/caption]
Step 10: Check data
Reload the application in a browser and check that the todo entries we added before are still there (meaning we have migrated the data successfully):
http://172.16.255.251:8000/
Note: It sometimes take 10 seconds for the MongoDB container to deploy and for the node.js container to connect to it. If the data does not appear, press refresh after 10 seconds.
How it works
The key part of this demonstration is the usage of Flocker to migrate data from one server to another. To make Flocker work natively with Mesos and Marathon, we've used Powerstrip. Powerstrip is an open-source project we started to prototype Docker extensions.
This demo uses the Flocker extension prototype (powerstrip-flocker). Once the official Docker extensions mechanism is released, Powerstrip will go away and you'll be able to use Flocker directly with Mesos and Marathon (or Docker Swarm or Kubernetes) to perform database migrations.
We have installed Powerstrip and powerstrip-flocker on each host. This means that when Marathon starts a container with volumes, powerstrip-flocker is able to prepare/migrate the required data volumes before docker starts the container.
Please note: Because this demo uses Powerstrip, which is only meant for prototyping Docker extensions, we do not recommend this configuration for anything approaching production usage. When Docker extensions become official, Flocker and Weave will support them. Until then, this is just a proof-of-concept.
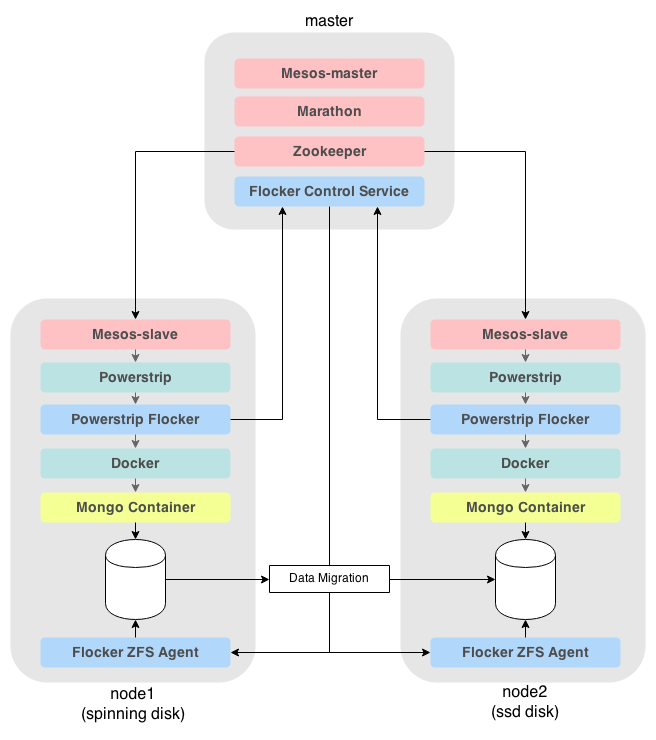
The Mesos cluster
The master node (which controls the cluster) is running the following components:
- mesos-master: the master node for the mesos cluster
- marathon: a mesos framework that runs long running processes
- zookeeper: a distributed key/value store
- flocker-control-service: the control service for the Flocker cluster
The two slave nodes each run:
- mesos-slave: the slave process that communicates with the mesos-master
- flocker-zfs-agent: the flocker slave process that communicates with the flocker-control-service
- powerstrip: the prototyping tool for Docker extensions
- powerstrip-flocker: a powerstrip adapter that creates ZFS volumes for containers
- powerstrip-weave: a powerstrip adapter that networks containers together across hosts
[caption id="attachment_1781" align="aligncenter" width="656"][
]21 Figure 8: Overview of the Mesosphere cluster[/caption]
Conclusion
Mesos and Marathon are powerful tools to manage a cluster of machines as though they are one large computer. We have shown in this demo that you can extend the behavior of Mesos slaves using Powerstrip adapters (and soon official Docker extensions).
This demo made use of local storage for your data volumes. Local storage is fast and cheap and with Flocker, it's also portable between servers and even clouds.
We are also working on adding support for shared storage to enable failover support when your hosts have access to network (e.g., EBS or SAN) storage.