Aug 15, 2019
Nick Jones
D2iQ

16 min read
For a lot of organizations, the days of building and deploying monolithic applications are long since over, and instead development effort is focused on microservices. A microservice architecture breaks down an application into atomic components. Its atomicity is defined as a technology boundary, business service boundary, or combination of the two, often making use of shared infrastructure services that provide data persistence and using communications methods such as RPC.
Operating infrastructure that supports a microservice architecture has its challenges, but the benefits of providing this service, such as scalability, improvements in productivity, and flexibility in technology selection outweighs the operational complexity.
Under the hood, this approach is borne from both old and new operating systems fundamentals. The rise of containerization, enabled by advanced Linux kernel features and subsequently popularized by Docker, has been a catalyst for this new approach. However, we’re still bound by the functionality provided by the TCP/IP networking stack along with its idiosyncrasies, and this manifests in Marathon when it comes to deciding which networking mode and ports you should select when you deploy your application.
Fortunately, platforms such as DC/OS make it relatively easy to run such a service. Let’s look at what happens under the hood to enable the running of multiple copies of the same application in a cloud native fashion. In this post, we’ll look at the various options presented, what they mean, and understand the implications by examining what’s going on at a host OS level.
Example Application
In order to bring this post to life, we’ll make use of a simple application which returns Pi to ten decimal places when accessed via HTTP. It’s written in Go and compiles down to a single binary, running happily as a stateless microservice via a container. It takes just one option - ‘-port’, and this is used to control the port on which our application listens for HTTP requests. The code for this demo lives here https://github.com/dcos-labs/httpi.
Host Mode Networking
Marathon has three networking modes - host, container/bridge, and container. Host mode is the simplest of networking modes and will probably be the most familiar. In host mode, networking services running in a container are exposed as if they were running on the host itself like a ‘traditional’ daemon or service.
Let’s look at an example by deploying a simple application using the following configuration:
{ "id": "httpi", "networks": [ { "mode": "host" } ], "portDefinitions": [ {"port": 0, "name": "http"} ], "container": { "type": "DOCKER", "docker": { "image": "dcoslabs/httpi:latest", "forcePullImage": true } }, "instances": 1, "cpus": 0.1, "mem": 32}The application definition example above tells Marathon to schedule our application using the Docker containerizer and that its networking should be the default - ‘host’. We have a single port definition labelled ‘http’ and it’s set to a value of 0, meaning Marathon will choose on our behalf. We can deploy and then check to see which port has been assigned by doing the following:
$ dcos marathon app add httpi_host.json$ dcos marathon app show /httpi | jq -r '.tasks[].ports[]'16327
The application we’re deploying takes into consideration an environment variable that’s set for us by Marathon called PORT_HTTP, as named under the portDefinitions section. This is passed to the small Golang application and tells it to listen on the value specified in that environment variable.
This means that we should be able to use an HTTP client to connect to the host on which our container is running and see the value of Pi returned:
$ dcos marathon app show /httpi | jq -r '.tasks[].ipAddresses[]'{ "ipAddress": "172.16.9.84", "protocol": "IPv4"}And then over on our DC/OS master:
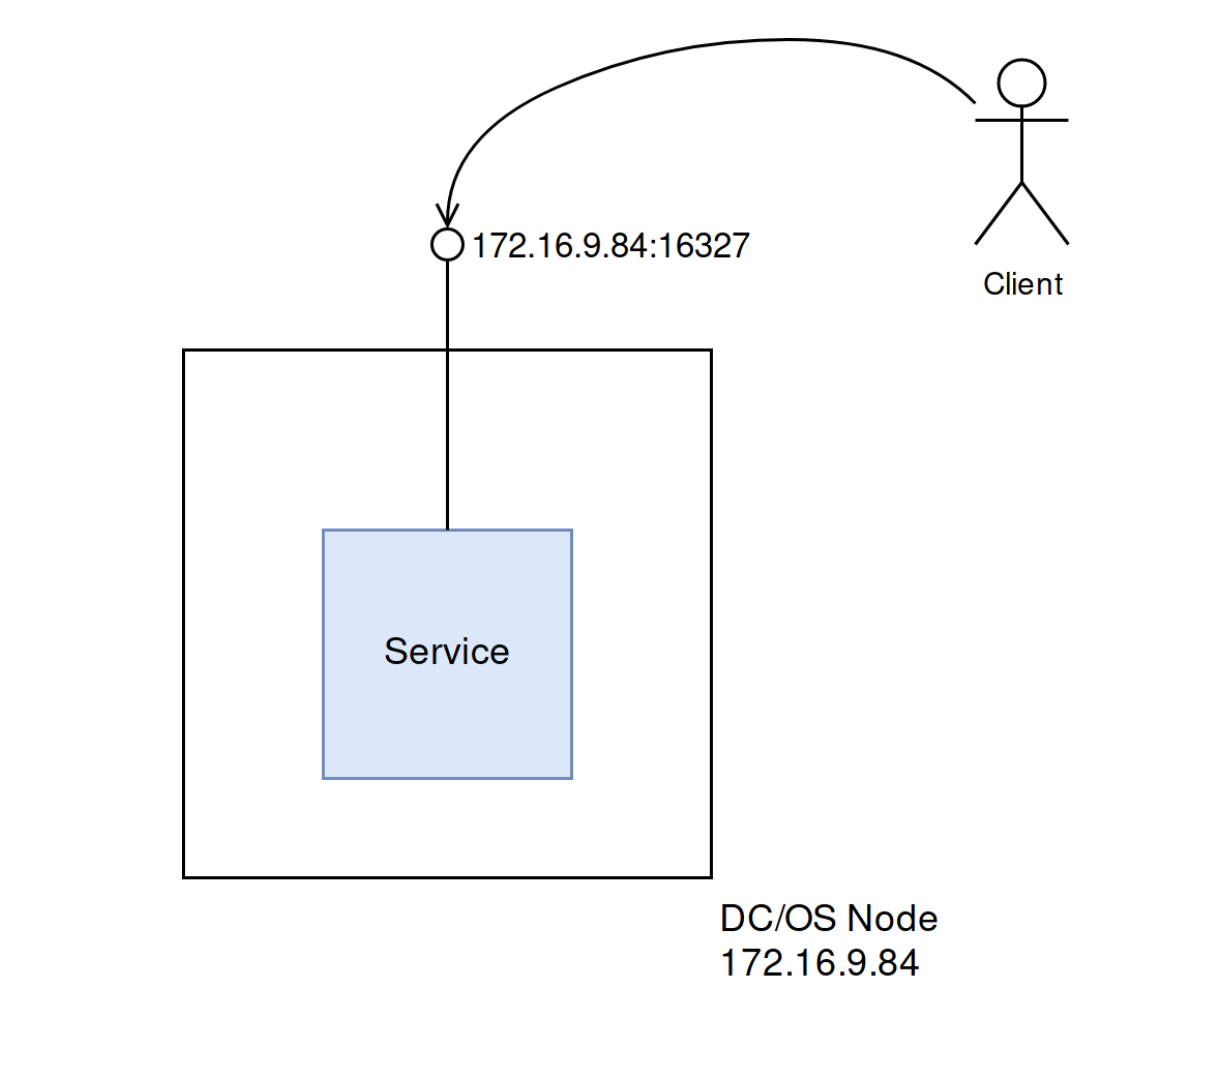
$ dcos node ssh --master-proxy --leader --user=centos[centos@ip-172-16-9-84 ~]$ curl http://172.16.9.84:163273.1415926536
From a client request perspective, we can imagine that it looks something like the following:
For the sake of completeness, let’s look at what Docker has configured for us on the agent in question. First, let’s find out which agent our singleton is running on:
$ dcos node ssh --master-proxy --user centos --mesos-id $(dcos marathon app show /httpi | jq -r '.tasks[].slaveId')
Now we can examine some of the Docker container-specific settings to double check that Marathon’s done the right thing on our behalf. For example, here are two commands that dump some of the salient options from a running container (note that we’ve not included the output for brevity’s sake):
[centos@ip-172-16-9-84 ~]$ sudo docker inspect mesos-4d89f563-28ee-4bf8-ba1b-7690503cdb8c | jq -r '.[].NetworkSettings'[centos@ip-172-16-9-84 ~]$ sudo docker inspect mesos-4d89f563-28ee-4bf8-ba1b-7690503cdb8c | jq -r '.[].Config.Env'
What happens when we run multiple instances of our application? With each instance using a unique port, how can other applications know where to connect to? DC/OS has several options for managing how traffic can discover and reach its intended destination, including layer-4 load-balancing via dcos-net and layer-7 via Marathon-LB. Next, we will walk you through an example for each of these.
Container/Bridge Mode and Load Balancing Using dcos-net
Let’s redeploy our application using the following configuration:
{ "id": "/httpi", "cpus": 0.1, "instances": 5, "mem": 32, "networks": [ { "mode": "container/bridge" } ], "requirePorts": false, "container": { "portMappings": [ { "labels": { "VIP_0": "/httpi:3141" }, "protocol": "tcp", "name": "http" } ], "type": "DOCKER", "volumes": [], "docker": { "image": "dcoslabs/httpi:latest", "forcePullImage": true, "privileged": false, "parameters": [] } }}This informs Marathon that it’s to deploy five copies of our service this time, and with the VIP_0 label set it also configures single a VIP - or Virtual IP - on our behalf. We’ve also told our containerizer to use container / bridge mode networking instead. This means that the containers that are deployed will have virtual Ethernet interfaces connected to a bridge on the host.
The ‘portMappings’ section gives us a way of telling Marathon about the service we’re about to deploy. By doing so, it can configure the underlying containerizer and the application we’re running in our container and determine which service should expose which port and how it’s mapped to provide external connectivity. Although we can specify additional settings when it comes to using a host or container port, Marathon is also capable of choosing and allocating on our behalf. This is exposed to our application by an environment variable of PORT_HTTP.
With this configuration and the aforementioned label, DC/OS also creates a DNS resource record which acts as an alias for the VIP that our clients can target. By default, the convention used is:
<vip-name>.<scheduler>.l4lb.thisdcos.directory:<vip-port>, so in our example this becomes httpi.marathon.l4lb.thisdcos.directory:3141. Again from a master or any agent node we can now test this with:
$ curl http://httpi.marathon.l4lb.thisdcos.directory:31413.1415926536
How can we ensure that it’s hitting any one of the backend nodes that our service is running on? If we resolve ‘httpi.marathon.l4lb.thisdcos.directory’, on our infrastructure we get an IP address of 11.249.78.219. However, no host in this cluster actually has an interface with that IP assigned. dcos-net makes use of another Linux kernel networking feature called IPVS, or IP Virtual Server. To query the IPVS configuration that’s been put into our hosts, we need to install a package that gives us the necessary command:
sudo yum install -y ipvsadm[..]Installed: ipvsadm.x86_64 0:1.27-7.el7
Complete!
And then:
$ sudo ipvsadm -LnIP Virtual Server version 1.2.1 (size=4096)Prot LocalAddress:Port Scheduler Flags -> RemoteAddress:Port Forward Weight ActiveConn InActConnTCP 11.249.78.219:3141 wlc -> 172.16.15.168:9896 Masq 1 0 0 -> 172.16.15.168:26186 Masq 1 0 0 -> 172.16.17.198:8584 Masq 1 0 0 -> 172.16.40.67:7143 Masq 1 0 0 -> 172.16.40.67:14666 Masq 1 0 0
IPVS handles redirecting TCP traffic destined for 11.249.78.219 port 3141 for us to any one of the five hosts listed above, and DC/OS takes care of applying this for us without any extra effort on our behalf.
On a side note, we can also retrieve the list of IP addresses and ports via DNS; Mesos-DNS creates an SRV resource record that we can query to return a similar list for our service. The documentation that describes the convention can be found here, or you can do the following:
$ dig +short _httpi._tcp.marathon.mesos SRV0 1 9896 httpi-7n7a6-s2.marathon.mesos.0 1 26186 httpi-9kxtg-s3.marathon.mesos.0 1 8584 httpi-kdkgr-s3.marathon.mesos.0 1 7143 httpi-y14gy-s1.marathon.mesos.0 1 14666 httpi-ekjsh-s1.marathon.mesos.
Notice that the third column corresponds to the port assigned to the container running our service.
As far as the containers themselves are concerned, we can examine the bridge configuration on a given agent node as follows. First, select an agent that’s running our service:
$ dcos marathon app show /httpi | jq -r '.tasks[].slaveId'602c0829-41e6-4910-91e5-16a38fa82c0a-S2602c0829-41e6-4910-91e5-16a38fa82c0a-S3602c0829-41e6-4910-91e5-16a38fa82c0a-S4602c0829-41e6-4910-91e5-16a38fa82c0a-S3602c0829-41e6-4910-91e5-16a38fa82c0a-S4
Then SSH:
$ dcos node ssh --master-proxy --user centos --mesos-id 602c0829-41e6-4910-91e5-16a38fa82c0a-S3
This node has two copies of our application running in Docker containers:
$ sudo docker ps --format "table {{.Names}}\t{{.Status}}"NAMES STATUSmesos-1e44c87b-4c24-479b-a3ce-70bb33ddfc25 Up 32 minutesmesos-881e3841-b58f-49dc-b20c-31253aa2cafb Up 32 minutesWe can see that there are also two interfaces associated with a bridge (called docker0), which is one side of a virtual Ethernet (veth) pair and the other is our container.
$ sudo bridge li69: veth10f72e2 state UP @(null): <BROADCAST,MULTICAST,UP,LOWER_UP> mtu 1500 master docker0 state forwarding priority 32 cost 271: vethd365035 state UP @(null): <BROADCAST,MULTICAST,UP,LOWER_UP> mtu 1500 master docker0 state forwarding priority 32 cost 2
This can also be validated by using the ‘docker’ command to inspect the network associated with a given container. We use ‘jq’ to filter the attributes that we care about:
$ sudo docker inspect mesos-1e44c87b-4c24-479b-a3ce-70bb33ddfc25 | jq -r '.[].NetworkSettings.Networks.bridge.NetworkID'cc5a44426e0c1f7b9605e03eb5c2205ae0726a7f6b666f068424f8ab0f2fe293$ sudo docker network inspect cc5a44426e0c1f7b9605e03eb5c2205ae0726a7f6b666f068424f8ab0f2fe293 | jq -r '.[].Containers'{ "1bd64c0d55ae69254c0284213782b946f6c4bea30629152e37023df0d614089b": { "Name": "mesos-881e3841-b58f-49dc-b20c-31253aa2cafb", "EndpointID": "4db549817f410c5e44f0ff3b9c7d88738248fcfbd245fda33fd6818c49566e40", "MacAddress": "02:42:ac:11:00:02", "IPv4Address": "172.17.0.2/16", "IPv6Address": "" }, "e99fd806dc8e4e01ea4cba8ccc5139bac1f7104595344e2ae7987b23d485d8e9": { "Name": "mesos-1e44c87b-4c24-479b-a3ce-70bb33ddfc25", "EndpointID": "a8d3084179e339f14aeef1ea771db6eefb232cb4b7837c4e1577f9fbf8095cfb", "MacAddress": "02:42:ac:11:00:03", "IPv4Address": "172.17.0.3/16", "IPv6Address": "" }}The containers themselves have an IP address that are automatically assigned from a network defined as part of Docker’s configuration. Last but not least, Network Address Translation (NAT) wires up client connections with a target IP and port, takes care of directing this request to the appropriate container once it hits our DC/OS node:
$ sudo iptables -n -t nat -L DOCKERChain DOCKER (2 references)target prot opt source destination RETURN all -- 0.0.0.0/0 0.0.0.0/0 DNAT tcp -- 0.0.0.0/0 0.0.0.0/0 tcp dpt:16106 to:172.17.0.2:16106DNAT tcp -- 0.0.0.0/0 0.0.0.0/0 tcp dpt:3651 to:172.17.0.3:3651
Traffic hitting our DC/OS node on port 1606 will be redirected to 172.17.0.2:16106, and for :3651 it’s redirected to 172.17.0.3:3651. These two addresses, as can be seen from the commands above, correspond with what our containers have assigned. Visualized for a given DC/OS node, it would look something like the following with instances of our containerized services represented by the blue boxes:
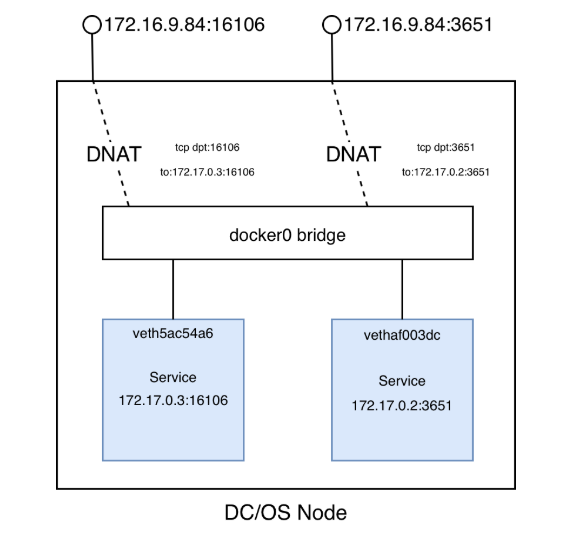
So end to end, ignoring HTTP protocol specifics:
- Client HTTP request hits http://httpi.marathon.l4lb.thisdcos.directory:3141
- httpi.marathon.l4lb.thisdcos.directory resolves to an IP address of 11.249.78.219;
- IPVS rules in place on each host translate and transparently redirects our request, choosing from a list of associated addresses corresponding to nodes in our cluster. In this example, we’ll use 172.16.15.168:9896;
- Or request continues onwards to the node whose IP corresponds to 172.16.15.168 and hits TCP port 9896;
- Destination NAT rules on the target host map this IP and port tuple to one that corresponds with a service running in a container;
- TCP connection is established and then our HTTP request can finally be answered.
Phew!
The flaw with this approach is that it requires an appropriate IPVS entry in place for our service. What happens if we need to expose something to clients outside of our DC/OS cluster? This is where something like Marathon-LB or EdgeLB fits in.
Load Balancing with Marathon-LB
For clients whose traffic originates outside our cluster, we need to move our load balancing capability a little further up the stack.

dcos-net works at layer 4, the transport layer, using mechanisms that require client configuration. In other words, it isn’t suitable for networks in which our traffic needs to be routed into our cluster from elsewhere. This is where we need to use something like Marathon-LB or Edge-LB which function at both layer-4 (TCP) and layer-7 (HTTP/HTTPS). Again, Marathon allows us to surface metadata via our application service definition so load balancers can configure network access dynamically and on-demand.
Let’s look at an example using container/bridge mode networking. First, we need to install Marathon-LB to our cluster by running the following command:
$ dcos package install marathon-lb --yes
Now we can update our service definition and re-deploy as follows:
{ "id": "/httpi", "cpus": 0.1, "instances": 5, "mem": 32, "networks": [ { "mode": "container/bridge" } ], "requirePorts": false, "labels":{ "HAPROXY_GROUP": "external", "HAPROXY_0_MODE": "http", "HAPROXY_0_PORT": "3141" }, "container": { "portMappings": [ { "labels": { "VIP_0": "/httpi:3141" }, "protocol": "tcp", "name": "http" } ], "type": "DOCKER", "volumes": [], "docker": { "image": "dcoslabs/httpi:latest", "forcePullImage": true, "privileged": false, "parameters": [] } }}The change here pretty much boils down to a new set of ‘labels’, prefixed with ‘HAPROXY’. These are read by Marathon-LB and used to configure the load balancer on our behalf. Once deployed, we can hit the IP address assigned to our public agent node (the one running Marathon-LB’s HAProxy service) and in turn receive a response from our microservice:
$ http 93.186.40.121:3141HTTP/1.1 200 OKContent-Length: 12Content-Type: text/plain; charset=utf-8Date: Mon, 22 Jul 2019 16:00:09 GMT 3.1415926536
Because we applied the right set of configuration options when deploying our service, this has all been automatically configured for us thanks to the magic of DC/OS. Every time we scale-up or scale-down our service by adding or removing containers, Marathon-LB will take care of updating its configuration for all members.
Container Mode Networking
The third and most advanced scenario is a configuration which allocates a dedicated IP address to each container. With this mode, containers get their own Linux networking namespace (and thus a dedicated network stack), and connectivity is managed by the underlying software-defined networking (SDN) provider technology. By allocating a dedicated IP per container, it removes the need for any port-mapping arrangements. It also facilitates service isolation by allowing network administrators to segregate and control traffic using firewall rules. Finally, the container’s network is isolated from the host’s, giving an additional degree of security in the event of compromise.
DC/OS supports both CNI (Container-network interface) and CNM (Container network model) standards which means that existing SDN solutions such as Calico, Cilium, and Flannel all work. DC/OS also provides its own virtual networking solution called DC/OS Overlay that we’ll use to demonstrate container-mode networking capability.
Let’s deploy our application again, but this time we’ll specify a networking mode of ‘container’ and use the default overlay network called ‘dcos’:
{ "id": "/httpi", "cpus": 0.1, "instances": 5, "mem": 32, "networks": [ { "mode": "container", "name": "dcos" } ], "requirePorts": false, "labels":{ "HAPROXY_GROUP": "external", "HAPROXY_0_MODE": "http", "HAPROXY_0_PORT": "3141" }, "container": { "portMappings": [ { "containerPort": 3141, "labels": { "VIP_0": "/httpi:3141" }, "protocol": "tcp", "name": "http" } ], "type": "DOCKER", "volumes": [], "docker": { "image": "dcoslabs/httpi:latest", "forcePullImage": true, "privileged": false, "parameters": [] } }}Once deployed, inspect the output of the ‘dcos marathon app show’ command to see the following:
$ dcos marathon app show /httpi | jq -r '.tasks[].ipAddresses[].ipAddress'9.0.2.1309.0.3.1309.0.3.1329.0.4.1309.0.3.131
In my case, I specified 5 copies of my application to be deployed initially, so there are 5 addresses allocated - one per container.
We can do some further poking around in the container configuration on a given agent:
sudo docker inspect mesos-c2e5a5a4-e3e3-45a2-ae15-3eb696d5b122 | jq -r '.[].NetworkSettings.Networks.dcos'{ "IPAMConfig": null, "Links": null, "Aliases": ["f90839231484" ], "NetworkID": "14d322c9f1896002eafed61d466c74d3ab667a1d9f8bf1431fd63ac2fe1b3320", "EndpointID": "900f49089bbbe5eb7f0ec2d1899fe5e4f03863198985dd8ed787b495d616b7a2", "Gateway": "9.0.3.129", "IPAddress": "9.0.3.131", "IPPrefixLen": 25, "IPv6Gateway": "", "GlobalIPv6Address": "", "GlobalIPv6PrefixLen": 0, "MacAddress": "02:42:09:00:03:83", "DriverOpts": null}Exposing our application’s network ports and services functions in the same way as the previous container/bridge mode networking example. With the same set of labels included in our application service definition, Marathon-LB handles creating the appropriate load balancer configuration on our behalf. This time, it points to the IP addresses and ports auto-allocated to each container, as opposed to the IP address of the agents running our services.
If you want a comprehensive overview on how the set of underlying technologies fit together, check out the DC/OS Overlay Design Guide documentation. Otherwise, here’s a quick breakdown that you can follow:
- Our containers are allocated a dedicated IP address on the overlay network we specified when launching our service;
- The networks we can choose from are defined at the time of DC/OS installation. In our example we used the default ‘dcos’ which is 9.0.0.0/8;
- The overlay network carries traffic between DC/OS nodes in the cluster using VXLAN;
- As long as all nodes in the cluster can reach one another, any application running on any node, regardless of geographic location or cloud platform provider, can reach a service on another container using its dedicated IP address.
When it comes to deploying and scaling services in a microservices environment, there’s a lot of complexity that’s automatically abstracted by container orchestration engines such as DC/OS. We hope this post helps you when it comes to choosing how your application should be deployed and its services exposed using DC/OS and Marathon.