
Aug 14, 2015
D2iQ
D2iQ

13 min read
This post was written by Micha Hernandez van Leuffen of wercker, and also ran on the wercker blog.
In this post we'll discuss how to deploy a project consisting of two services to Mesosphere, or more specifically a running Marathon instance. One service will be a web application that outputs simple JSON, and the other will be a router application that will direct traffic to the correct hosts (more on that later). We'll explain how to setup an automated workflow that will allow you to easily update, replace and scale your applications on Mesosphere using wercker.
Mesosphere has created a Datacenter Operating System that allows you to deploy, run and scale your apps while providing a single interface to do so. This makes it a perfect deploy target for wercker!
It uses the open-source Marathon, a cluster-wide init and control system for services in cgroups or Docker containers, to manage and launch apps.
Wercker is an open platform and toolchain for developing, building and deploying containerized applications in an automated fashion. Wercker uses Docker as its underlying container technology.
Sign up and read more about wercker here.
Let's get started!
Requirements
- A clone of the wercker-mesosphere repository
- A clone of the router repository
- An account on wercker and wercker repositories for each above-mentioned project
- A running Mesosphere cluster
Overview
Before we start, let's take a look at how our Mesosphere setup looks like.
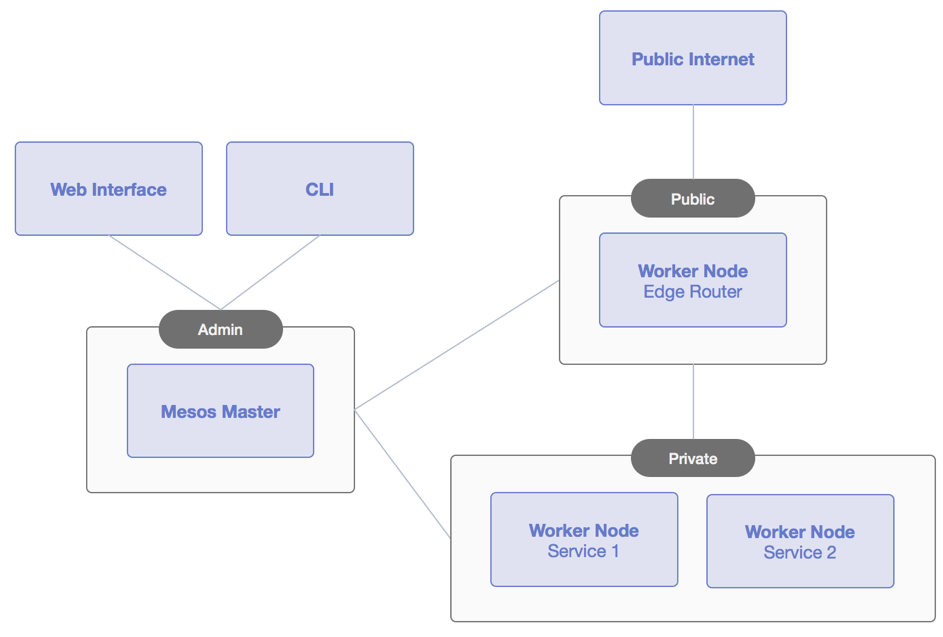
If you followed the Mesosphere tutorial for AWS, this is how your infrastructure should look like. For this demo, we're primarily interested in the public and the private worker nodes depicted above.
The app that we will be deploying is a simple web application that outputs JSON and is run inside a Docker container. This app will be run on one or more private nodes. These private nodes, as their name implies, are not accessible from the internet. This is where a second application, the edgerouter application comes into play. The edgerouter is in charge of routing any incoming traffic to containers on any of the private slaves.
This means that our application consists of two components: the router and the web application itself.
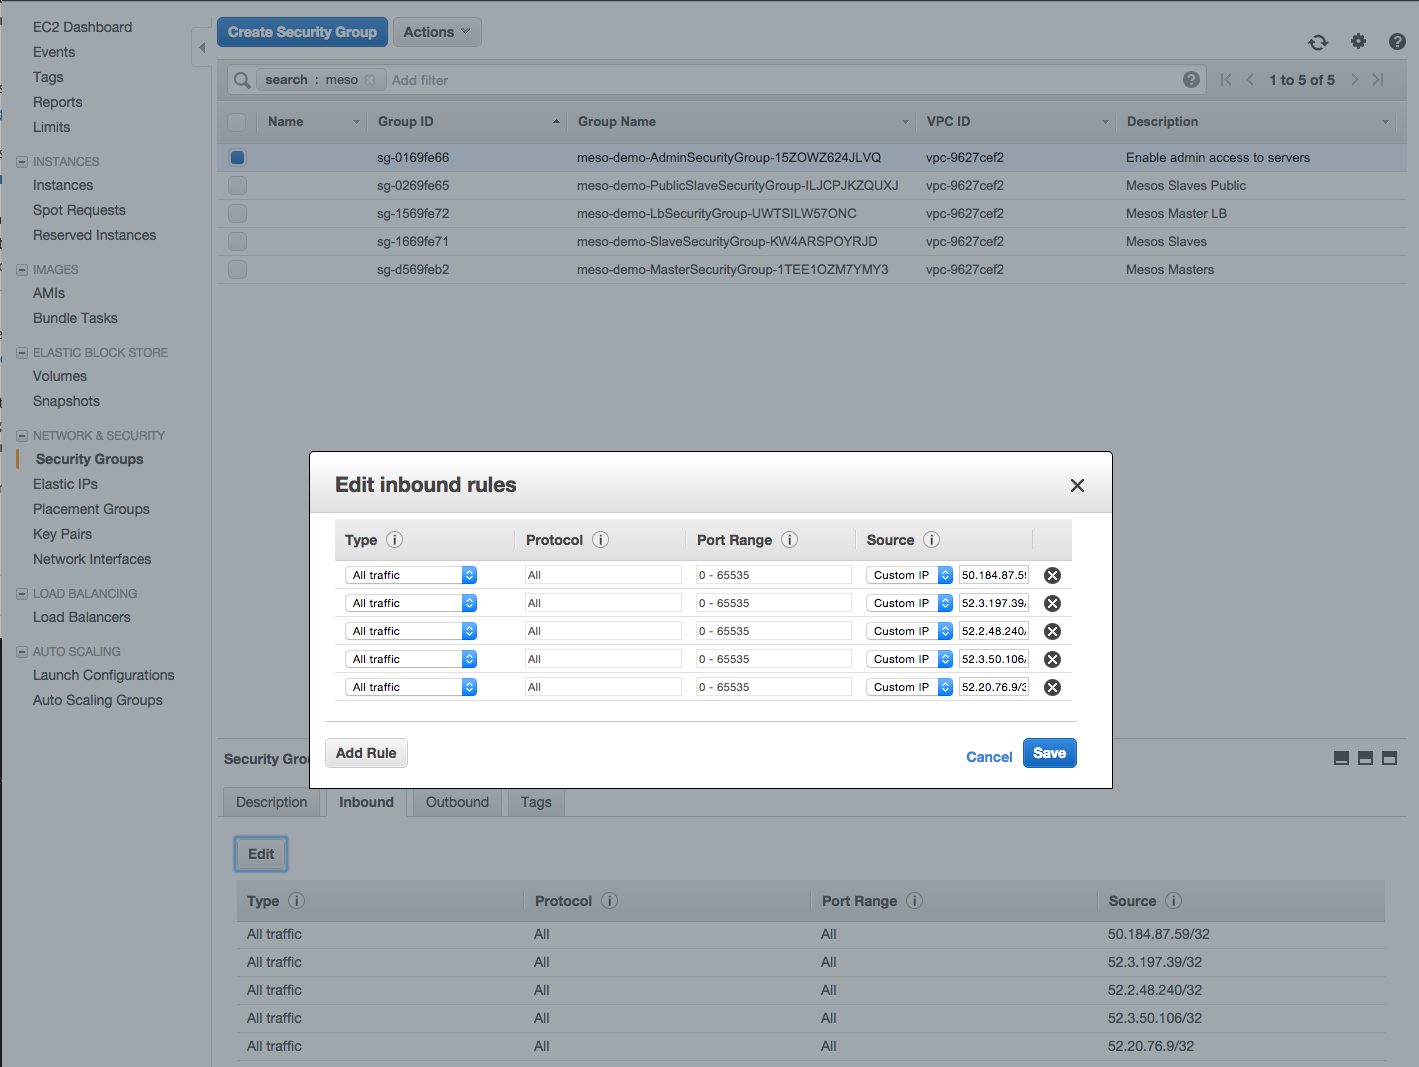
Configuring AWS EC2 Security Groups
In order to to successfully deploy applications with wercker, we have to whitelist some of wercker's IP addresses. This can be done by editing the Security Groups (SGs) found under the Network & Security tab in EC2.
You'll have to look for something similar to MesoAdminSecurityGroup SG and then edit the inbound ruleset so that it contains the following IP ranges as specified in this GitHub issue.
Note: Don't forget to add /32 at the end of every IP to indicate the range.
Setting up the web application
The first step is to get our web application deployed. In the wercker-mesosphere project directory, open main.go in your favorite editor and add a new city to the JSON array.
data := []byte(`{"cities":{"cities":"San Francisco, Amsterdam, Berlin, New York, Tokyo, Warsaw, London"}`)Once you've done that, we can take a look at the wercker.yml to see what wercker is going to do for us:
box: golang# Build definitionbuild: # The steps that will be executed on build steps: # Build the project - script: name: go build ./... code: go build ./... - script: name: copy binary code: | cp source $WERCKER_OUTPUT_DIR/app cp template.sh $WERCKER_OUTPUT_DIR
The build pipeline is nothing special. It builds our app and then copies the binary and the template (we'll get to that later) to the $WERCKER_OUTPUT_DIR which makes it available to the deploy pipeline. What's more interesting is our deploy pipeline, which we'll define now.
Defining the deploy pipeline
Open up your wercker.yml and just below the build pipeline, add the following:
deploy: dockerhub: - internal/docker-push: username: $DOCKER_USERNAME password: $DOCKER_PASSWORD repository: $APP_IMAGE cmd: "/pipeline/source/app" ports: "$CONTAINER_PORT" marathon: - script: name: generate json code: chmod +x template.sh && ./template.sh - wercker/marathon-deploy: marathon-url: $MARATHON_ENDPOINT app-name: $APP_NAME app-json-file: $APP_NAME.json instances: "$INSTANCES"
The first important thing to note is that our deploy pipeline consists of two deploy targets: dockerhub and marathon.
Because our app is going to live inside a container, every time we make any changes to the sourcecode, we need to push it to a registry (in this case DockerHub).
However, if we merely want to scale the amount of instances up or down, there's no need to push our image to DockerHub again, which is why we have the second deploy target. You can read more about defining multiple deploy targets in the devcenter.
To deploy apps to Mesosphere, it requires JSON files that describe the app and the config needed to run it. This config is generated by the script step in our marathon deploy target. If you open the template.sh script in your project directory, you'll see that all it does is interpolates the necessary environment variables and outputs the result in $APP_NAME.json.
In short, our deploy process will consist of two steps: first we need to push our app to DockerHub and then we must deploy our JSON configuration to Mesosphere.
Setting up the deploy targets
First, if you have not already done so, you need to create a new app on wercker. Use your forked / cloned wercker-mesosphere project as repository.
Next, we need to add the two deploy targets we'll be working with, corresponding with the deploy targets we specified in our wercker.yml earlier. Head over to your application settings and go to Deploy targets. Click on Add deploy target and select custom. Name your deploy target dockerhub and click save.
DockerHub deploy target
For our dockerhub deploy target, we're going to setup two environment variables to make our deployment easier: $DOCKER_USERNAME and $DOCKER_PASSWORD. These should container your DockerHub username and password, respectively. Make sure these environment variables coincide with the wercker.yml snippets you use throughout the blogpost and that you're $DOCKER_PASSWORD is set to protected, so that it won't show up in any logs.
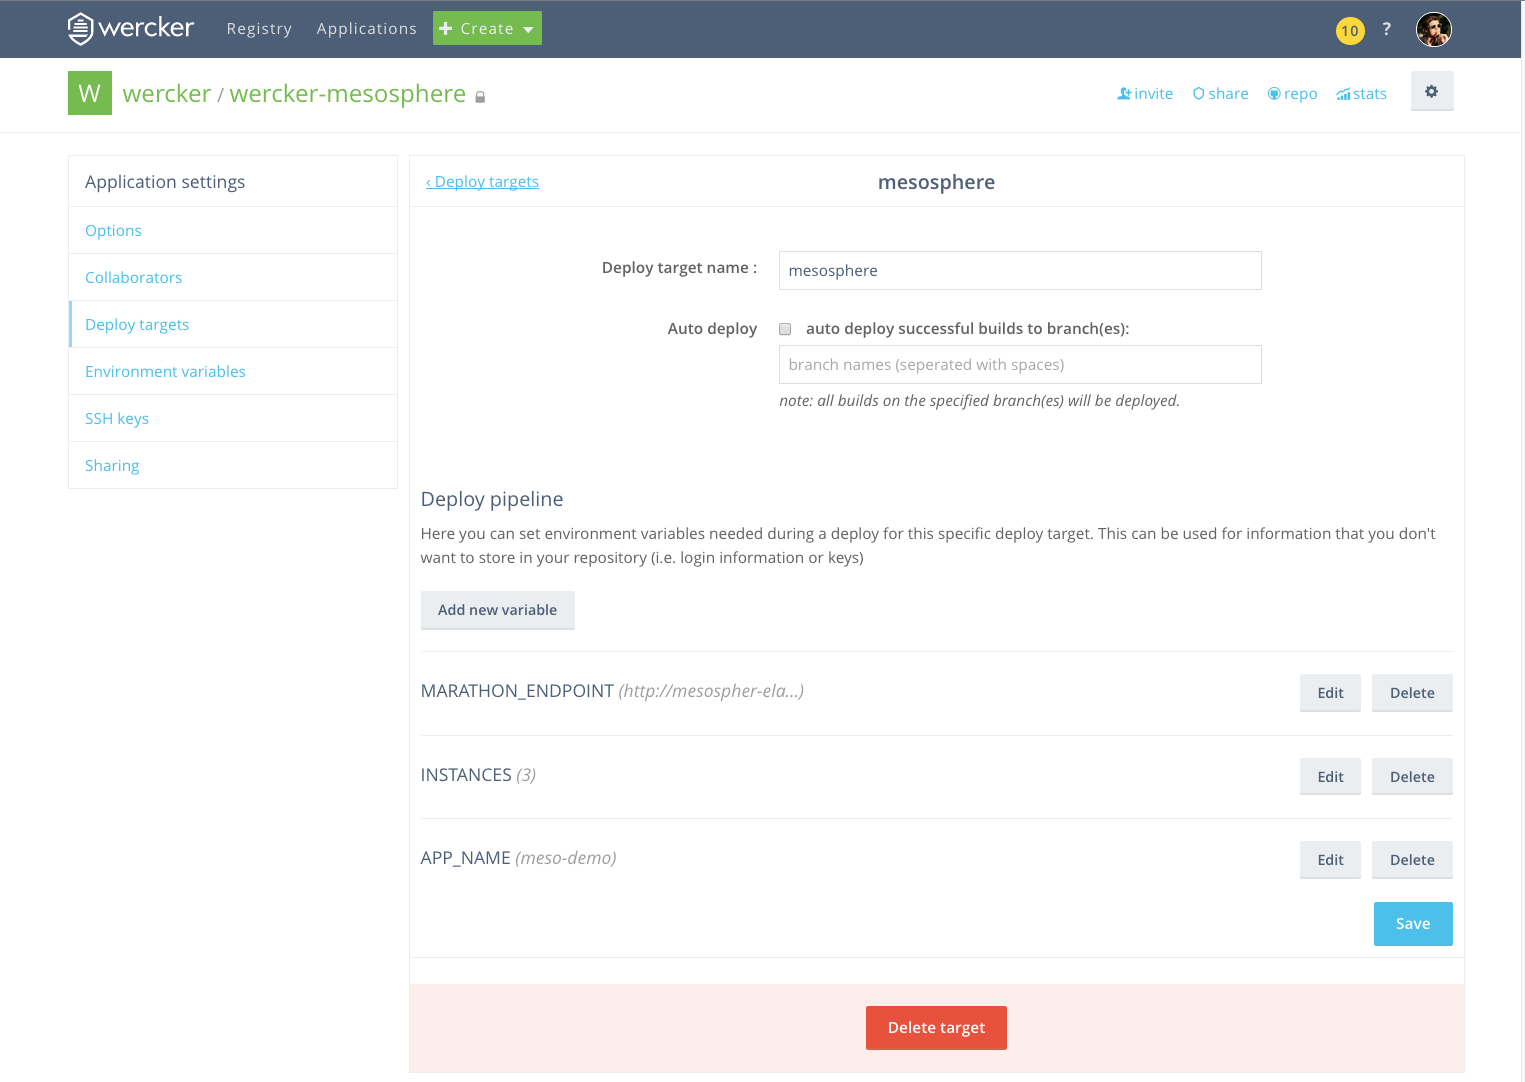
Mesosphere Deploy target
Once you're done with the dockerhub deploy target, hit save and again set up a new deploy target. This time, call it mesosphere and hit save once more.
For this deploy target, we'll setup three environment variables: $MARATHON_ENDPOINT, $INSTANCES and $APP_NAME. $MARATHON_ENDPOINT should contain the URL where your marathon instance lives. If you have your mesosphere cluster setup on AWS, it should look something like this: http://mesospher-elasticl-<unique-hash>.amazonaws.com/service/marathon/.
$INSTANCES should specify how many instances of your webapp you want to deploy. For this tutorial, we'll set this value to 3. Lastly, $APP_NAME should contain the name of the app that marathon will use. For this tutorial, let's call it meso-demo.
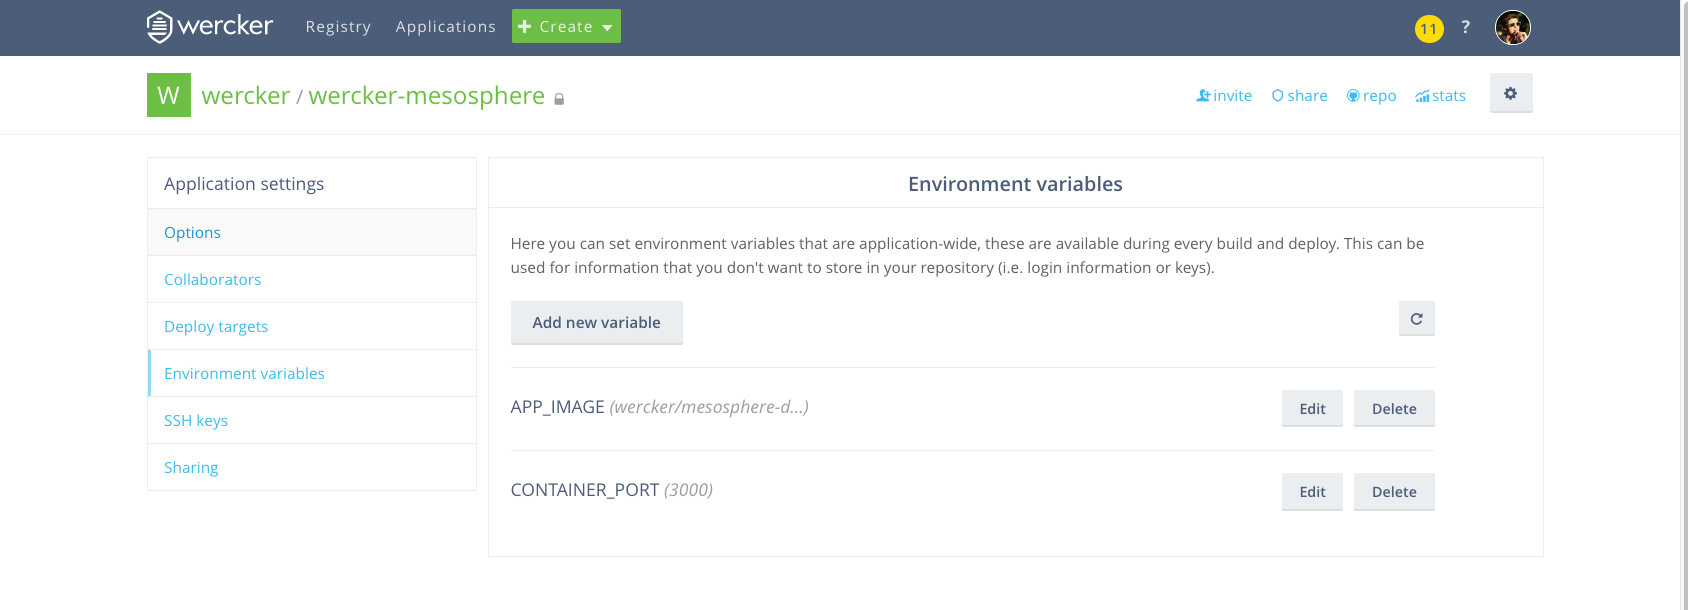
General environment variables
There are two environment variables, $APP_IMAGE and $CONTAINER_PORT that are shared between the two deploy targets. Since they're shared, we can specify them as project-wide environment variables.
To do this, head over to the Environment variables tab and create a new env var. The $APP_IMAGE should contain the repository/image you will be pushing the container to. Set this value to whatever DockerHub repository you will be pushing to. The $CONTAINER_PORT value should specify which port the application will be running on. This will be port 3000.
Deploying the web application
Now that we've setup our web application, we can commit our changes and see our wercker build run!
git commit -am 'added deploy pipeline'git push
Head over to your project page on wercker and see the build run. Once it successfully finishes, hit the deploy to button and select dockerhub.
This will trigger a deploy that will push our image to DockerHub, as we described in our wercker.yml. Once this deploy finishes, head back to your build page and hit the deploy to button again, but this time select mesosphere.
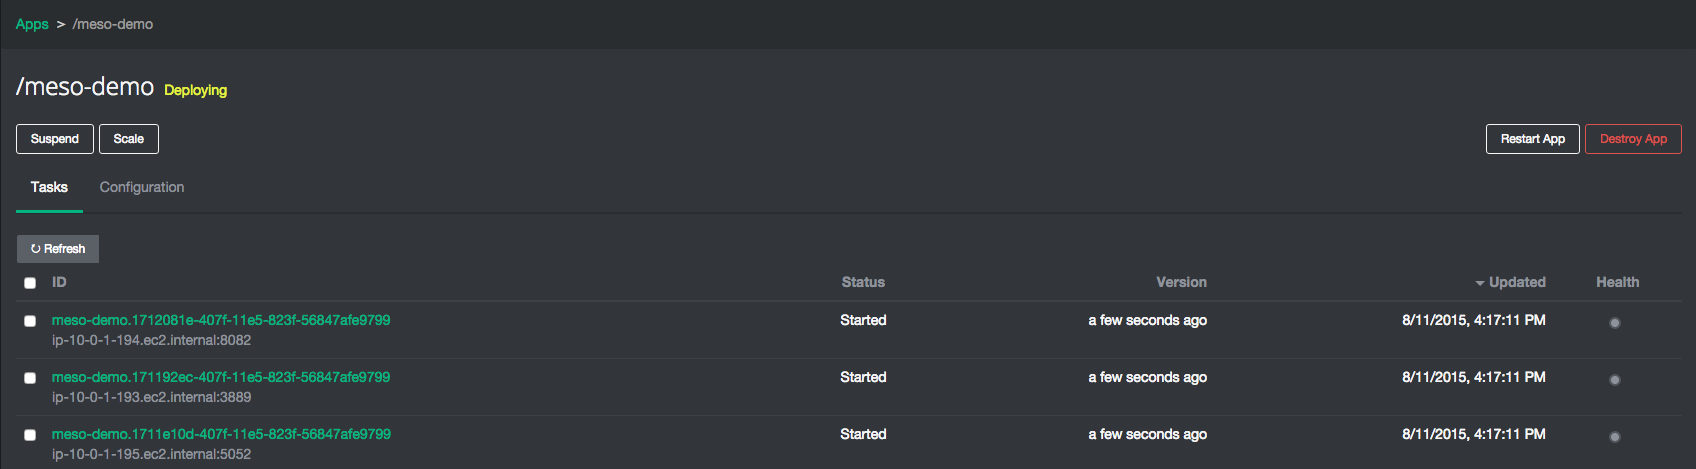
Once the pipeline completes, you should see that Marathon is now deploying our new app!
Setting up the router
Our app is now tucked away in a container on one or more of our private worker nodes. To be able to use our application, we'll need to setup a router which will route traffic coming from the Internet to correct destination.
To setup our router, we need to follow the same steps as we did for our web application. That means we need to create a project on wercker, using your forked / cloned app as target repository.
For the marathon target, create: $MARATHON_ENDPOINT, $INSTANCES and $APP_NAME. For the $APP_NAME env var, we need to specify the name of our webapp that Marathon will work with, because our router needs to know to which Marathon app it needs to communicate with. In our case, this should be meso-demo.
The $INSTANCES env var describes how many instances of the app you want to launch. Since we only require 1 instance of the router, you can optionally exclude this env var as the default is 1 instance anyway. For clarity, we'll explicitly define it here.
Finally, we need three more env var that will be shared between the two deploy targets, so head to the Environment Variables settings and add the $APP_IMAGE, $DOCKER_USERNAME and $DOCKER_PASSWORD environment variables. $APP_IMAGE will hold the image name of our router; you can use your DockerHubUsername/repository here. We're specifying our Docker credentials as general environment variables, because we're not going to have a dockerhub deploy target this time. Instead, our docker-push will take place in our build pipeline.
Setting up the build pipeline
Now that we've setup our env vars, we can take a look at our actual pipeline. This is the complete build pipeline for the router app:
box: debian:jessiebuild: steps: - install-packages: packages: wget build-essential libreadline-dev libncurses5-dev - script: name: install ngx code: | wget http://openresty.org/download/ngx_openresty-1.7.10.1.ta && tar xvfz ngx_openresty-1.7.10.1.tar.gz \ && cd ngx_openresty-1.7.10.1 \ && ./configure --with-luajit --with-http_gzip_static_modul && make \ && make install \ && rm -rf /ngx_openresty* - script: name: mkdir code: mkdir -p mkdir /usr/local/openresty/nginx/conf - script: name: cp template.sh code: cp template.sh $WERCKER_OUTPUT_DIR - script: name: cp config & chmod code: cp nginx.conf app.lua /usr/local/openresty/nginx/conf/ & - internal/docker-push: username: $DOCKER_USERNAME password: $DOCKER_PASSWORD repository: $APP_IMAGE cmd: "/usr/local/openresty/nginx/sbin/nginx" ports: "8080"
Our router is essentially a nginx container with some custom LUA configuration files that allow the traffic to be forwarded accordingly (this is where the $APP_NAME env var gets used). You can open up the app.lua file in the router project directory to see how it works exactly.
We're specifying our docker-push here, because we need the nginx installation included in our image.
Now that we've discussed the build pipeline, it's time to add the deploy pipeline to our wercker.yml:
deploy: steps: - install-packages: packages: curl - script: name: generate json code: chmod +x template.sh && ./template.sh - wercker/marathon-deploy: marathon-url: $MARATHON_ENDPOINT app-name: "edgerouter" app-json-file: "router.json"
There's only one deploy target for our router, so there is no need to give a name.
The other difference with the web app is the JSON that gets generated and the env vars that get passed in. Your generated router.json will look similar to this:
{ "id": "/edgerouter", "cpus": 1, "mem": 256, "instances": 1, "constraints": [["hostname", "UNIQUE"]], "acceptedResourceRoles": ["slave_public"], "container": { "type": "DOCKER", "docker": { "image": "wercker/mesosphere-router", "network": "BRIDGE", "forcePullImage": true, "portMappings": [ { "containerPort": 8080, "hostPort": 80, "protocol": "tcp" } ] } }, "healthChecks": [{ "protocol": "TCP", "gracePeriodSeconds": 600, "intervalSeconds": 30, "portIndex": 0, "timeoutSeconds": 10, "maxConsecutiveFailures": 2 }], "env": {"APP_NAME": "meso-demo"}}Note the env section at the last line of the generated JSON. This env var will get injected into the container by marathon and will be used by nginx to determine which app it should route traffic to.
Deploying the router
Now that everything is set up, let's trigger a new pipeline by committing our changes:
git commit -am 'added deploy pipeline'git push origin master
Once the build pipeline completes, it will have deployed to DockerHub, so we're ready to deploy it to Marathon next. As before, hit the deploy to button and select marathon.
Once everything is deployed, head over to your Marathon dashboard and verify everything is being deployed. When the router is deployed, it will still take a while to propegate the changes. Head over to the public worker's URL and then keep hitting that refresh button until our JSON appears.
Once it's there, you will have successfully deployed your first app(s) to Mesosphere!

If you want to scale the amount of instances for your web application up or down, you can just modify the env var in your wercker configuration and redeploy to marathon. Nice 'n easy.
Wrapping up
Following this tutorial you spun up your first app on mesosphere. While that's pretty awesome, the app itself is pretty simple. That's why we're going to follow up with a part two of this tutorial, where we'll show you how to deploy an application with multiple moving parts, so stay tuned!