Apr 06, 2016
Brenden Matthews
D2iQ
12 min read
Background reading: If you'd like to implement the example below, it's suggested that you read the previous posts on service discovery and load balancing with marathon-lb. Part 1 can be found here, and Part 2 is here.
About the author: Brenden is a computer nerd from Canada who's passionate about steak, and doesn't like pants.
Our customers often ask us how to properly secure HTTP traffic, a problem faced by businesses of all stripes. This post can serve as your guide down a small part of the path toward secure operations in your datacenter. Specifically, we're going to cover server-client encryption and will discuss some techniques that you can use for enabling TLS for HTTP services.
In 2016, there are few reasons not to secure HTTP. In the past, reasons given for not enabling HTTPS have included the cost of obtaining valid certificates, the complexity of managing certificates and the performance penalty of encrypting traffic. Today, however, it's possible to obtain and automate certificate management at no cost through Let's Encrypt, which is an ACME-enabled certificate authority. Regarding the performance overhead of encryption, modern Intel CPUs include hardware acceleration features that are enabled in newer versions of OpenSSL.
Let's Encrypt, which we'll explore in this post, is a Linux Foundation tool for programmatically generating valid TLS/SSL certificates. ACME is a specification for creating automated certificate authorities, which was created by developers at Mozilla, Google and other companies with the ultimate goal of securing the web.
At the time of writing, Let's Encrypt has issued more than 1.3 million certificates (and you can see the full list of CNs issued here). Every certificate may contain up to 100 alternate domains without wildcards, and validation is enabled through DNS. Certificates are valid for 90 days after issue, and renewal can be easily automated through the reference implementation ACME client.
Let's discuss the steps involved in creating an HTTP service secured with TLS, using DCOS, and some sample OpenResty-based apps. If you'd like to skip ahead, check out the letsencrypt-dcos GitHub repo.
Prerequisites
To run through this exercise, you're going to need the following:
- A Mesosphere Datacenter Operating System (DCOS) cluster, or a Mesos cluster with Marathon 0.15.0+, marathon-lb 1.1.4+ and Docker 1.9+ installed.
- A fully qualified domain name (FQDN). In our example, we're going to use two domains: ssl-test-1.mesosphere.com and ssl-test-2.mesosphere.com.
- At least two publicly accessible agent nodes with ports 80 and 443 open, or an equivalent external load balancer.
For the rest of this post, I'll assume you've created a cluster on AWS using our CloudFormation templates. With this, you'll have a public Elastic Load Balancer (ELB) that provides a unique A record. If you don't have an ELB, your public agents should have publicly routable static IP addresses.
Step 1: DNS
Since I already have a public ELB, I'm going to configure my test domains (ssl-test-1.mesosphere.com and ssl-test-2.mesosphere.com) to point to my ELB, using a CNAME with the magic A record provided by AWS. The A record for the ELB can be retrieved from the AWS console. If you're using Route53 for DNS (like we do), the configuration will look like this (from the AWS console):
In the example above, I have a CNAME record for ssl-test-1.mesosphere.com pointing to my ELB's A record, which is brenden-l-publicsl-nlbulpj25ga2-1108492860.us-west-2.elb.amazonaws.com. You can verify this yourself:
$ dig ssl-test-1.mesosphere.com...;; QUESTION SECTION:;ssl-test-1.mesosphere.com. IN A;; ANSWER SECTION:ssl-test-1.mesosphere.com. 26 IN CNAME brenden-l-publicsl-nlbulpj25ga2-1108492860.us-west-2.elb.amazonaws.com.brenden-l-publicsl-nlbulpj25ga2-1108492860.us-west-2.elb.amazonaws.com. 26 IN A 52.24.18.21brenden-l-publicsl-nlbulpj25ga2-1108492860.us-west-2.elb.amazonaws.com. 26 IN A 52.32.115.56...
In the case where you want to point directly at HAProxy (without using an ELB), you'd create an A record with all the publicly routable IP addresses for your marathon-lb instances. The length of the TTL isn't critical, but if you think the IP addresses may occasionally change, it's suggested you use a shorter TTL between 60 and 300 in case you need to rotate IP addresses.
Step 1.5: Check ELB and security settings
If you're using an ELB, you'll want to check that the health check settings are correct, and the security group is correctly configured. It's recommended that you close all ports except 80 and 443, unless you have some other special services which bind to other ports.
For the health check, my ELB is configured to use marathon-lb's /_haproxy_health_check endpoint on port 9090, with a 5-second interval and 2-second timeout. This will ensure that I only route traffic from the ELB to healthy HAProxy backends. In the AWS console, it looks like this:
For the security group, every port except 80 and 443 are closed:
For the ELB listeners, port 80 is configured as HTTP, and port 443 is configured as TCP:
Step 2: Install marathon-lb
This one is pretty straightforward. If you haven't already, go ahead and install marathon-lb:
$ dcos package install marathon-lb --yes
Wait for marathon-lb to deploy across all the public agents. If, for example, you're running three public agents, scale it to three instances:
$ dcos marathon app update /marathon-lb instances=3
Wait for marathon-lb to deploy and go green. It'll look like this in Marathon:
Step 3: Launch letsencrypt-dcos
And now, the moment you've been waiting for—running the ACME client from Let's Encrypt to generate a valid SSL certificate, and configuring HAProxy (via marathon-lb) with our new certificate. To do this, we're going to run an app on Marathon that contains the necessary components: the Let's Encrypt ACME client, and a couple small scripts to manage the certificates.
In particular, there are two scripts worth noting:
- run.sh: This script will parse the environment variables, call the Let's Encrypt client and post the new cert to marathon-lb by calling post_cert.py. The script will check every 24 hours to see if the certificate needs renewal, and update marathon-lb accordingly.
- post_cert.py: This script is used to compare the current cert in marathon-lb to the new cert, and will trigger a new deployment of marathon-lb if the cert has changed.
The app is configured via environment variables and labels. Here's the Marathon app definition:
{ "id":"/letsencrypt-dcos", "cpus":0.05, "mem":128, "instances":1, "container":{ "type":"DOCKER", "docker":{ "image":"mesosphere/letsencrypt-dcos", "network":"BRIDGE", "portMappings":[ { "containerPort":80, "hostPort":0, "servicePort":10000, "protocol":"tcp" } ] } }, "env":{ "MARATHON_URL":"http://master.mesos:8080", "MARATHON_LB_ID":"marathon-lb", "LETSENCRYPT_EMAIL":"brenden@mesosphere.com" }, "labels":{ "HAPROXY_0_VHOST":"ssl-test-1.mesosphere.com,ssl-test-2.mesosphere.com", "HAPROXY_0_PATH":"/.well-known/acme-challenge", "HAPROXY_GROUP":"external" }, "backoffSeconds":5}There are two values above which you'll need to modify: LETSENCRYPT_EMAIL and HAPROXY_0_VHOST. The former should be your email address, not mine. The latter should contain a comma separated list of the domains you're generating the certificate for, up to 100 total, with the first domain being the CN for the certificate.
Clone the letsencrypt-dcos repo to make your changes:
$ git clone https://github.com/mesosphere/letsencrypt-dcos.git$ cd letsencrypt-dcos... make changes ...
Now that you've changed the VHost and email address in letsencrypt-dcos.json, we can deploy the app:
$ dcos marathon app add letsencrypt-dcos.json
If everything goes well, you'll see that a new deployment of marathon-lb will be triggered 15-20 seconds after the app is started. Check that the letsencrypt-dcos app is not flapping: If the cert validation process fails, it will continuously restart, and you may eventually get throttled by the Let's Encrypt rate limits.
Once everything is deployed, you can run a quick test with cURL to see if everything's kosher:
$ curl -Lv https://ssl-test-1.mesosphere.com/* Trying 52.32.115.56...* Connected to ssl-test-1.mesosphere.com (52.32.115.56) port 443 (#0)* TLS 1.2 connection using TLS_ECDHE_RSA_WITH_AES_128_GCM_SHA256* Server certificate: ssl-test-1.mesosphere.com* Server certificate: Let's Encrypt Authority X3* Server certificate: DST Root CA X3> GET / HTTP/1.1>> Host: ssl-test-1.mesosphere.com>> User-Agent: curl/7.43.0>> Accept: */*>* HTTP 1.0, assume close after body< HTTP/1.0 503 Service Unavailable< Cache-Control: no-cache< Connection: close< Content-Type: text/html<<html><body><h1>503 Service Unavailable</h1>No server is available to handle this request.</body></html>
Success! However, HAProxy is returning a 503 because there are no backends to route to. Before we move on, let's validate our HTTPS config using the Qualys SSL tests:
- https://www.ssllabs.com/ssltest/analyze.html?d=ssl-test-1.mesosphere.com&latest
- https://www.ssllabs.com/ssltest/analyze.html?d=ssl-test-2.mesosphere.com&latest
Result:
You should see the first domain has an A+ rating, whereas the second has an A rating by Qualys. We'll discuss why this is a bit later. Go ahead and try substituting your own domain, and then move on to the next step.
Step 4: Launch test apps
I've created two test apps, which have the same code, but each with slightly different HAProxy configurations. I've aptly named them letsencrypt-dcos-test-1 and letsencrypt-dcos-test-2. From the letsencrypt-dcos Git repo, change into the test directory and modify the HAPROXY_0_VHOST label of one app to match your domain, and deploy it:
$ cd test# edit letsencrypt-dcos-test-1.json$ dcos marathon app add letsencrypt-dcos-test-1.json
Once it's deployed, you should be able to reach the app. Open it in your browser, and you'll see something like this:
You can see that our test app is actually running cURL against the same host and protocol for the originating HTTP request. Now, let's examine the labels we're using for ssl-test-1.mesosphere.com from the Marathon app definition:
"labels":{ "HAPROXY_GROUP":"external", "HAPROXY_0_VHOST":"ssl-test-1.mesosphere.com", "HAPROXY_0_REDIRECT_TO_HTTPS":"true", "HAPROXY_0_USE_HSTS":"true"There are two rather important labels here worth understanding:
- HAPROXY_0_REDIRECT_TO_HTTPS: This creates an HAProxy config rule to redirect traffic for this VHost to HTTPS, if the protocol is currently HTTP. This is good practice, and you should usually do this. HAProxy will return HTTP/1.1 301 Moved Permanently when you make a request.
- HAPROXY_0_USE_HSTS: This label tells HAProxy to enable HTTP Strict Transport Security (HSTS), by appending the Strict-Transport-Security header to the HTTP response headers. The default max age is six months. Note: you may not want to enable this by default; read on to see why.
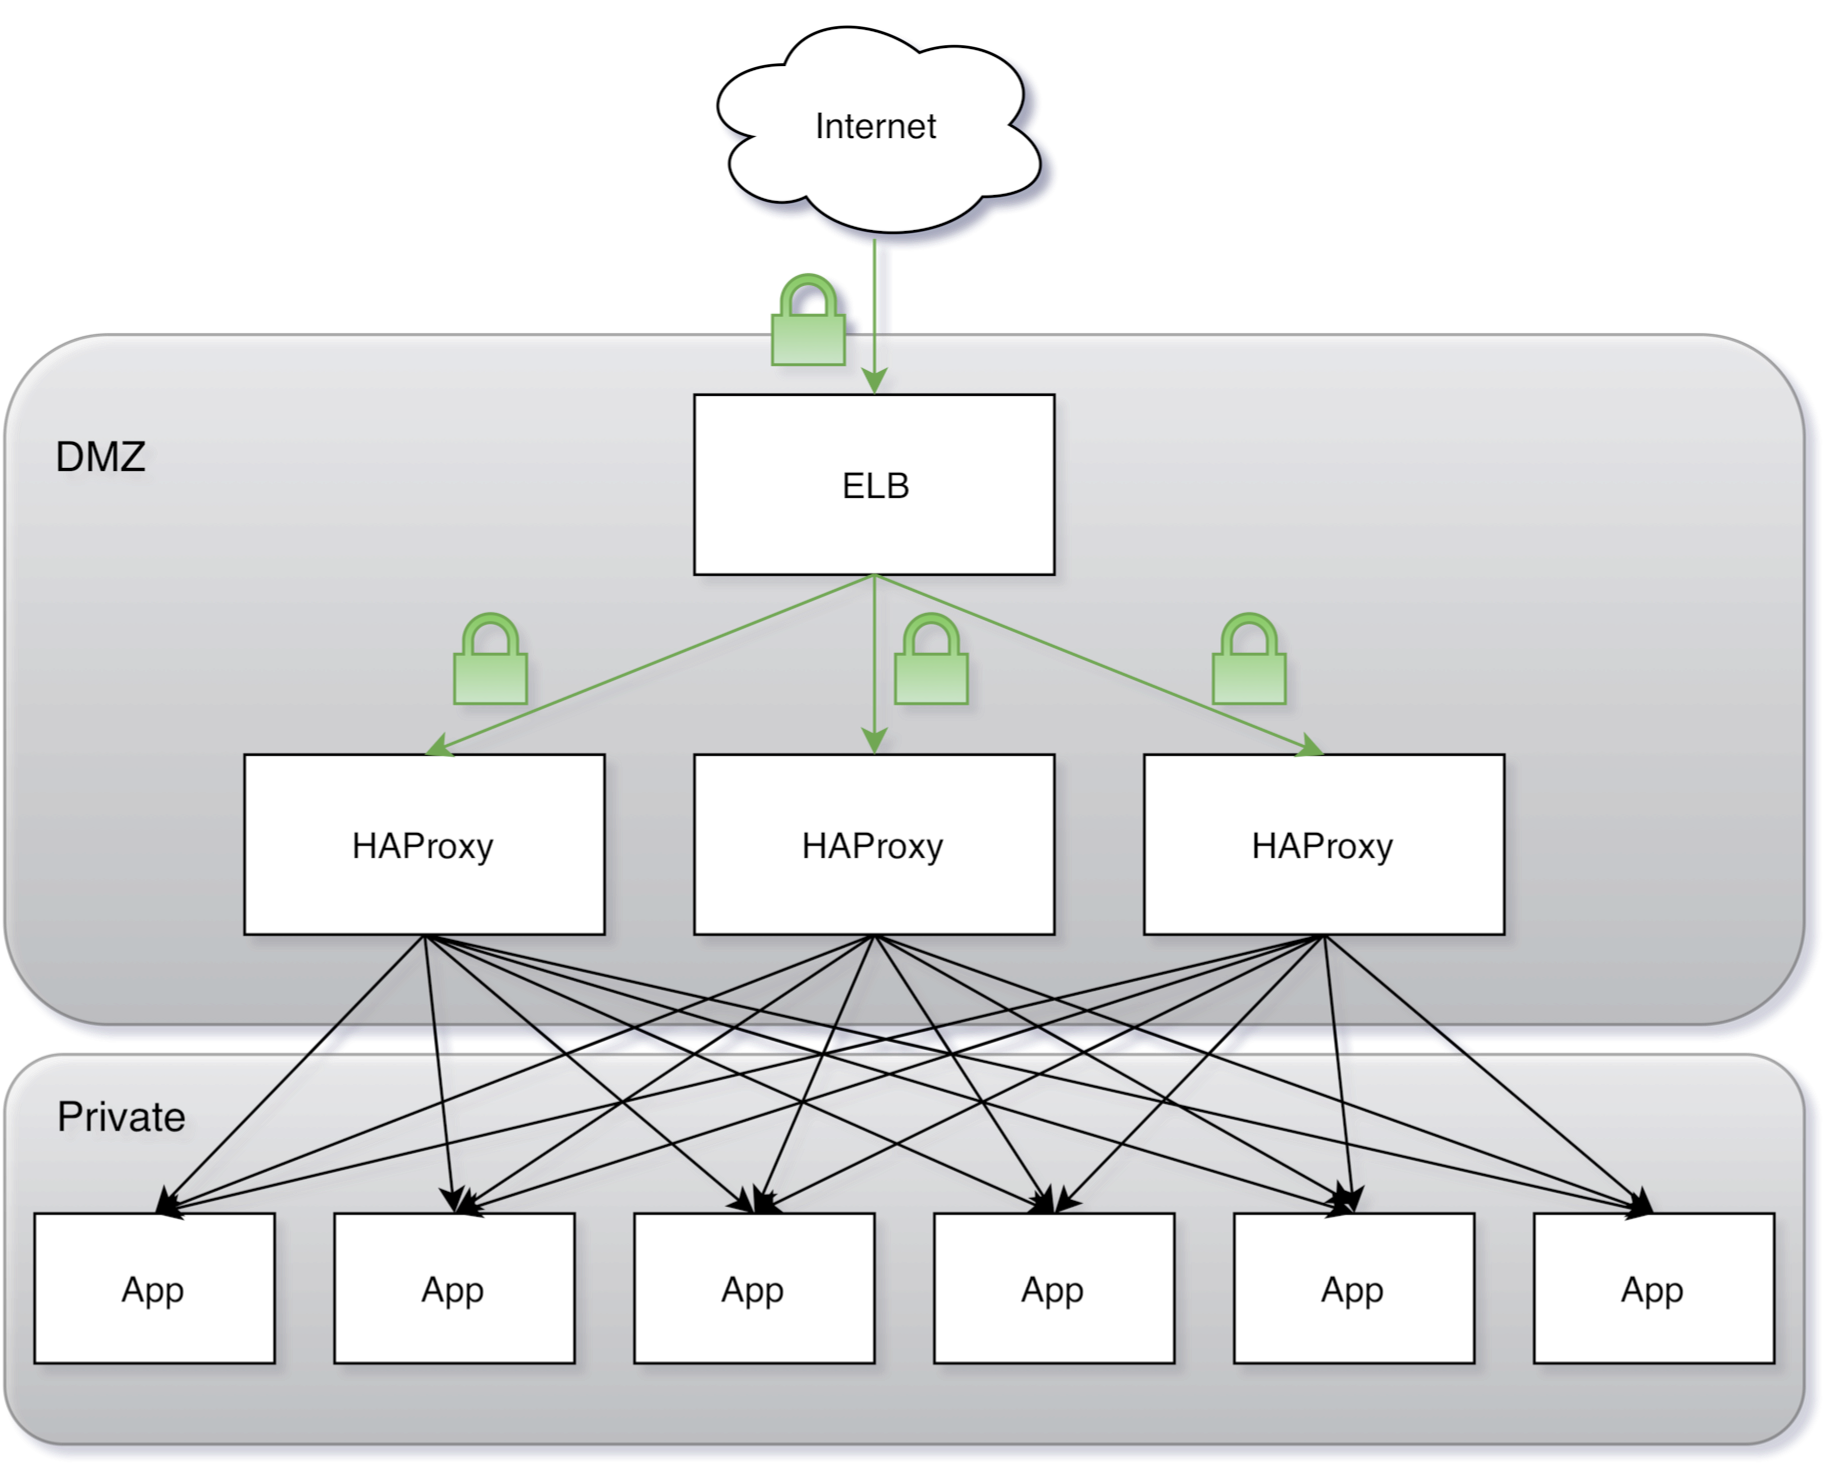
At a high level, what we have looks something like this:
We're routing traffic from the Internet, over a TLS tunnel, through the ELB and terminating TLS at HAProxy. The ELB and public slaves are in our DMZ, which means they may be reached from the Internet. All traffic between HAProxy and our private nodes is not encrypted.
Go ahead and edit & deploy the second app with a different hostname (if you have it):
$ dcos marathon app add letsencrypt-dcos-test-2.json
Now you should be able to reach http://ssl-test-2.mesosphere.com, and you may also notice that there's no redirect to HTTPS. For ssl-test-2, you'd have to explicitly set the scheme to HTTPS.
Examining our security policy
Security is hard. So, how do we know we've correctly configured HAProxy such that it's actually secure? You might also notice that we received an A+ rating from Qualys on the first app, but we only got an A on the second app. What gives? These are great questions, which I'll try to answer here.
For the most part, the configuration for the two apps is the same, with a couple of key differences. The first app has two important features enabled: an HTTP-to-HTTPS redirect (enabled by HAPROXY_0_REDIRECT_TO_HTTPS) and HSTS (enabled by HAPROXY_0_USE_HSTS). The redirect will force clients who connect over HTTP to switch to HTTPS, because HAProxy won't allow any other requests.
But what is HSTS, and why do we care? HSTS (which stands for HTTP Strict Transport Security) was created to address man-in-the-middle (MITM) or protocol downgrade attacks. The issue may occur when a proxy between the client and the server intercepts and decrypts the HTTP traffic before the client ever sees it. This would allow the attacker to hijack cookies, collect data and possibly impersonate users (remember the Firesheep incident?).
Imagine yourself sitting in a cafe somewhere, using its free unsecured WiFi, surfing your favorite website (mine is this Justin Bieber fansite), while someone is snooping on your every action without your knowledge.
To illustrate that scenario, I've created a diagram:
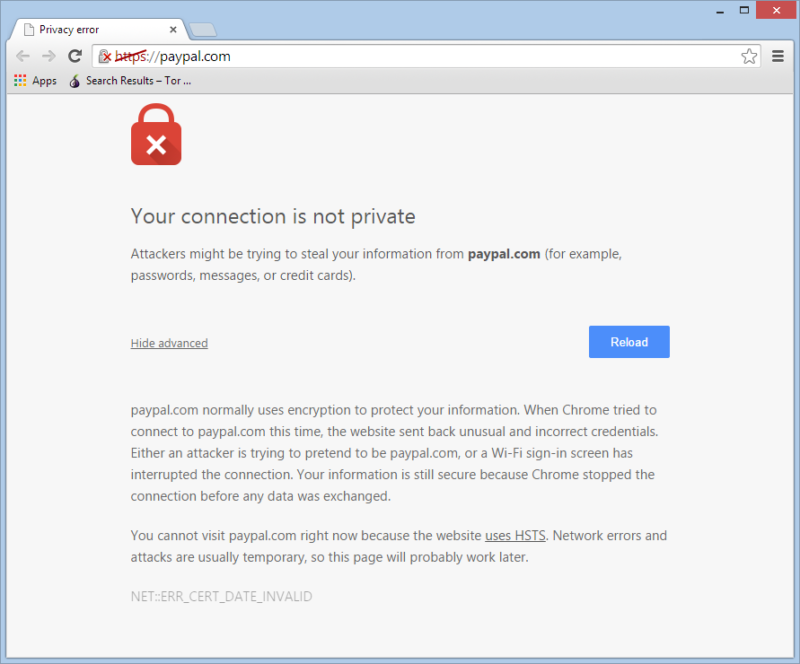
So, how does HSTS actually solve this? HSTS (sometimes referred to as ‘pinning') allows you to add a special HTTP header to the server response, which tells the client that it must always connect to this host using a validated HTTPS connection. The client (or web browser) will remember that this host should always use HTTPS; if, for any reason, HTTPS is not available, or the cert is invalid, the browser will display a warning instead of allowing the connection. Like this:
HSTS is what helps us get from A to A+. One final note on HSTS: There's an attack vector whereby a client may still be subject to a MITM attack if the client is visiting an HSTS enabled site for the very first time. To mitigate this, you can request your site be added to the HSTS preload list for all major browsers. Thankfully, there's a handy web form to do just that.
Also, there's one catch to enabling HSTS: Once it's done, it can't readily be undone. If you decide to enable HSTS, you must be prepared to support HTTPS forever. Should you enable HSTS anyway? Yes! The benefits outweigh the risks.
What else goes into our A+ rating from Qualys? We've followed Mozilla's guidelines for securing your site in the default HAProxy configuration that ships with marathon-lb. Click here to see the actual HAProxy config that's generated by marathon-lb. Here are the highlights:
- We're using a valid, trusted cert (thanks to Let's Encrypt).
- Legacy SSL v2 and v3 protocols are disabled.
- Strong ciphers are preferred.
- Weak or broken ciphers (like MD5) are disabled.
- We use a 4,096-bit key by default.
- We're using an up-to-date version of OpenSSL.
Final thoughts
After reading all of this, you should be reasonably comfortable with deploying a public-facing app on DCOS with HTTPS enabled. While we didn't exhaustively cover all topics in this article, it should provide you with a good starting point, and you should understand some of the risks and requirements for providing secure server-to-client communication.