Jun 04, 2018
Matt Jarvis
D2iQ
18 min read
DC/OS frameworks are much more than just package installers; they provide a mechanism for full lifecycle management for complex applications, bundling operational best practices with automation of common actions such as scaling and upgrading. Distributed systems require complex playbooks for such operations, and the Mesos concept of application-aware scheduling makes it easy to deliver complex software as-a-Service.
The ability to run Kubernetes-as-a-Service is a great example. It's built on top of the DC/OS SDK, and automatically manages an underlying Kubernetes cluster, in much the same way as Kubernetes manages applications.
To deploy a Kubernetes cluster into DC/OS, we could use the UI, CLI, or API, but in order to illustrate the function of the scheduler let's use the CLI. Now we could just run:
dcos package install kubernetes
This would give us a basic Kubernetes cluster and the DC/OS Kubernetes CLI extensions, but it won't be highly available, and we'll only have 1 Kubernetes node for applications. This is fine for testing, but in production we're going to want something a bit more robust. We can increase our node count to 3, and tick the high availability box from the DC/OS UI. Then simply click the Review and Run button:
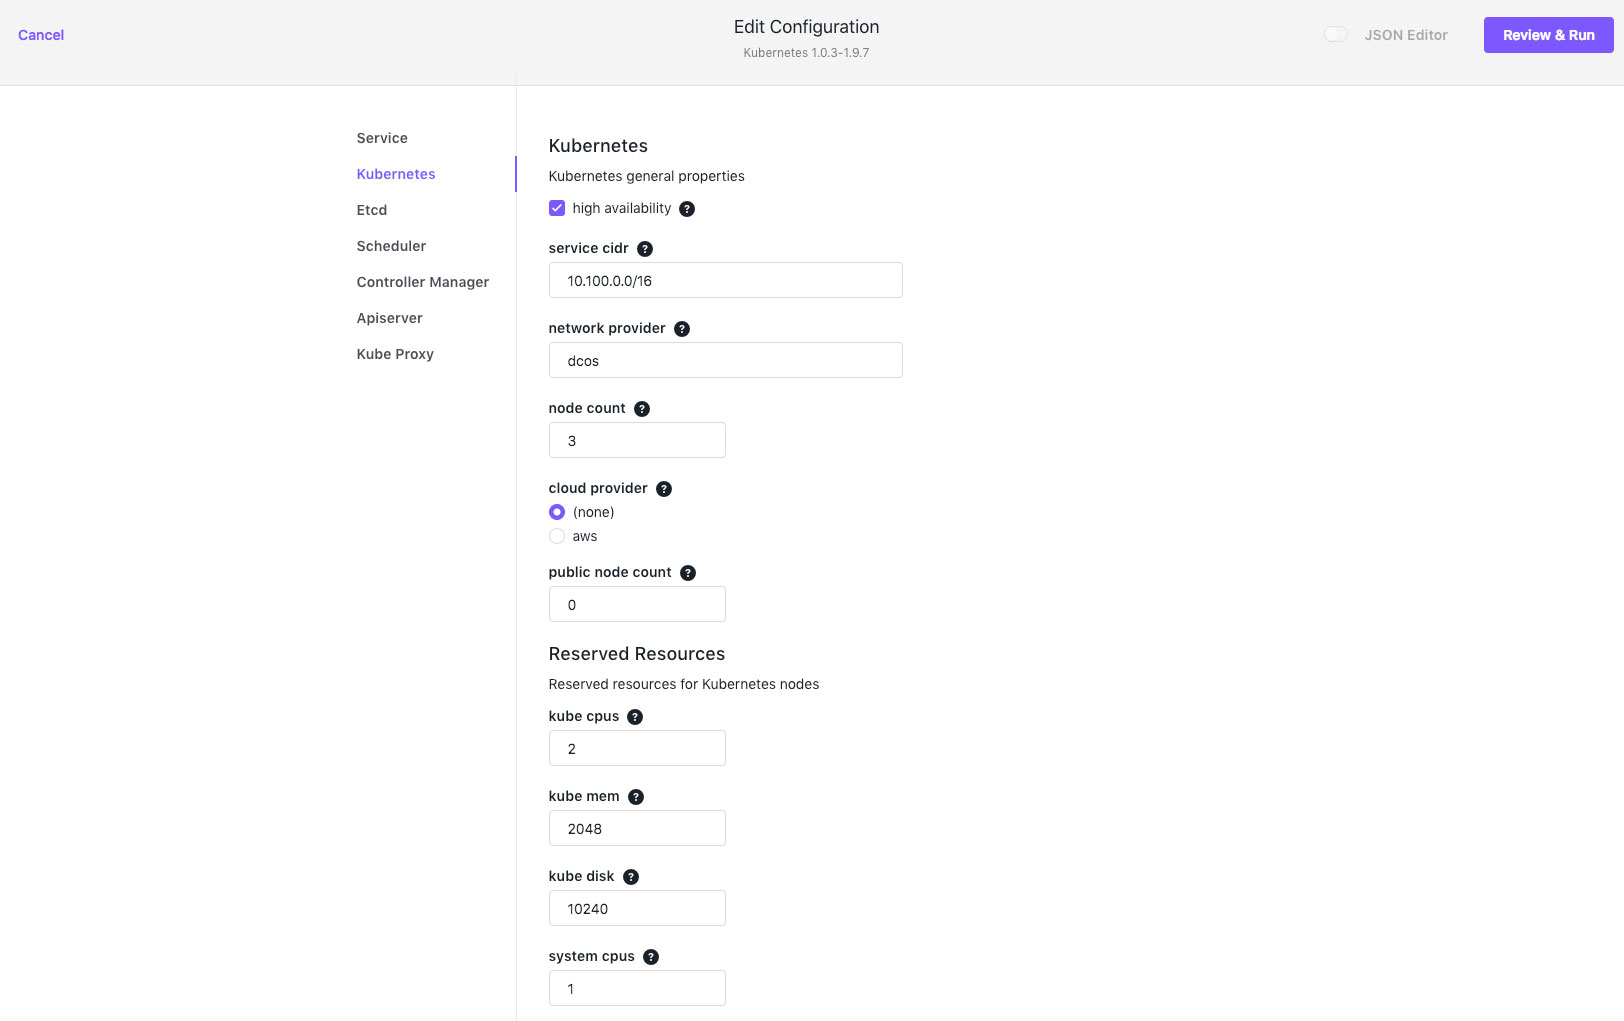
We can also configure these options via the CLI, by using a custom JSON configuration file, so let's build a real production ready cluster. Aside from changing the node_count and high_availability settings, the rest of the configuration provides sane defaults for memory, CPU and resources. This is all fully configurable, and there is further guidance in the documentation. For our purposes, let's add 3 Kubernetes nodes and make the cluster highly available, for which our JSON will look like:
{ "service": { "name": "kubernetes", "sleep": 1000, "service_account": "", "service_account_secret": "", "log_level": "INFO" }, "kubernetes": { "high_availability": true, "service_cidr": "10.100.0.0/16", "network_provider": "dcos", "node_count": 3, "cloud_provider": "(none)", "public_node_count": 0, "reserved_resources": { "kube_cpus": 2, "kube_mem": 2048, "kube_disk": 10240, "system_cpus": 1, "system_mem": 1024 } }, "etcd": { "cpus": 0.5, "mem": 1024, "data_disk": 3072, "wal_disk": 512, "disk_type": "ROOT" }, "scheduler": { "cpus": 0.5, "mem": 512 }, "controller_manager": { "cpus": 0.5, "mem": 512 } "apiserver": { "cpus": 0.5, "mem": 1024 }, "kube_proxy": { "cpus": 0.1, "mem": 512 }To install using this JSON, our CLI command will look something like:
dcos package install kubernetes --package-version=1.0.2-1.9.6 --options=kube.json
The file kube.json contains the JSON configuration above, and we're going to specify the package version for the purposes of this blog in order to perform an upgrade later on.
Mattbook-Pro:kube matt$ dcos package install kubernetes --package-version=1.0.2-1.9.6 --options=kube.jsonBy Deploying, you agree to the Terms and Conditions https://d2iq.com/catalog-terms-conditions/#certified-servicesKubernetes on DC/OS. Documentation: https://docs.mesosphere.com/service-docs/kubernetes Issues: https://github.com/mesosphere/dcos-kubernetes-quickstart/issuesContinue installing? [yes/no] yesInstalling Marathon app for package [kubernetes] version [1.0.2-1.9.6]Installing CLI subcommand for package [kubernetes] version [1.0.2-1.9.6]New command available: dcos kubernetesDC/OS Kubernetes is being installed!
As mentioned above, when we run our CLI command, we can also see that the Kubernetes CLI extension is automatically deployed locally. This will give us some important tools that we'll explore later on. If we'd installed through the UI, we'd need to install the CLI extensions separately. We can do that from the CLI by running:
dcos package install kubernetes --cli
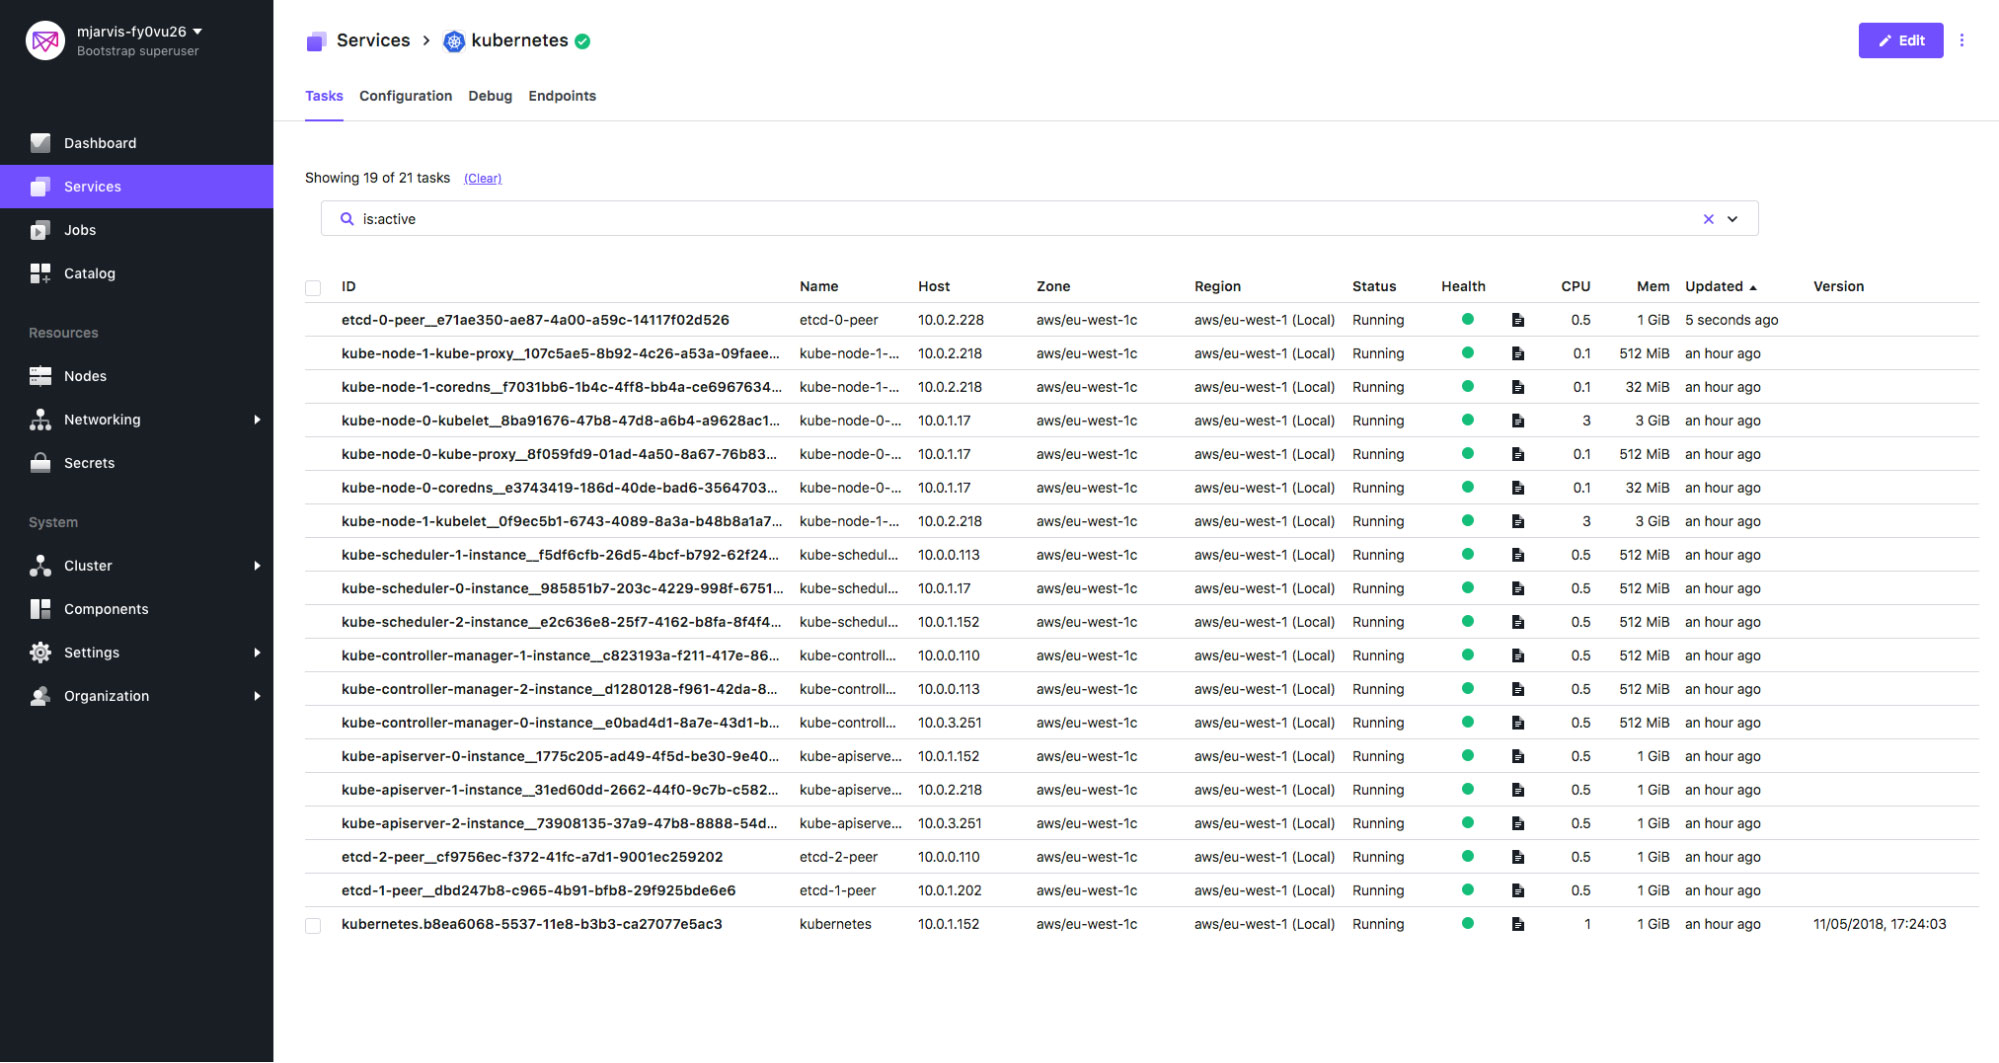
If we now look at the Services tab in the UI, we can see our cluster being deployed. The first thing that is deployed is the Kubernetes framework scheduler. This is a Java based application, deployed into a container in our DC/OS cluster, which will orchestrate all the further actions on the Kubernetes cluster itself by accepting Mesos resource offers and choosing where to deploy the elements of our cluster.
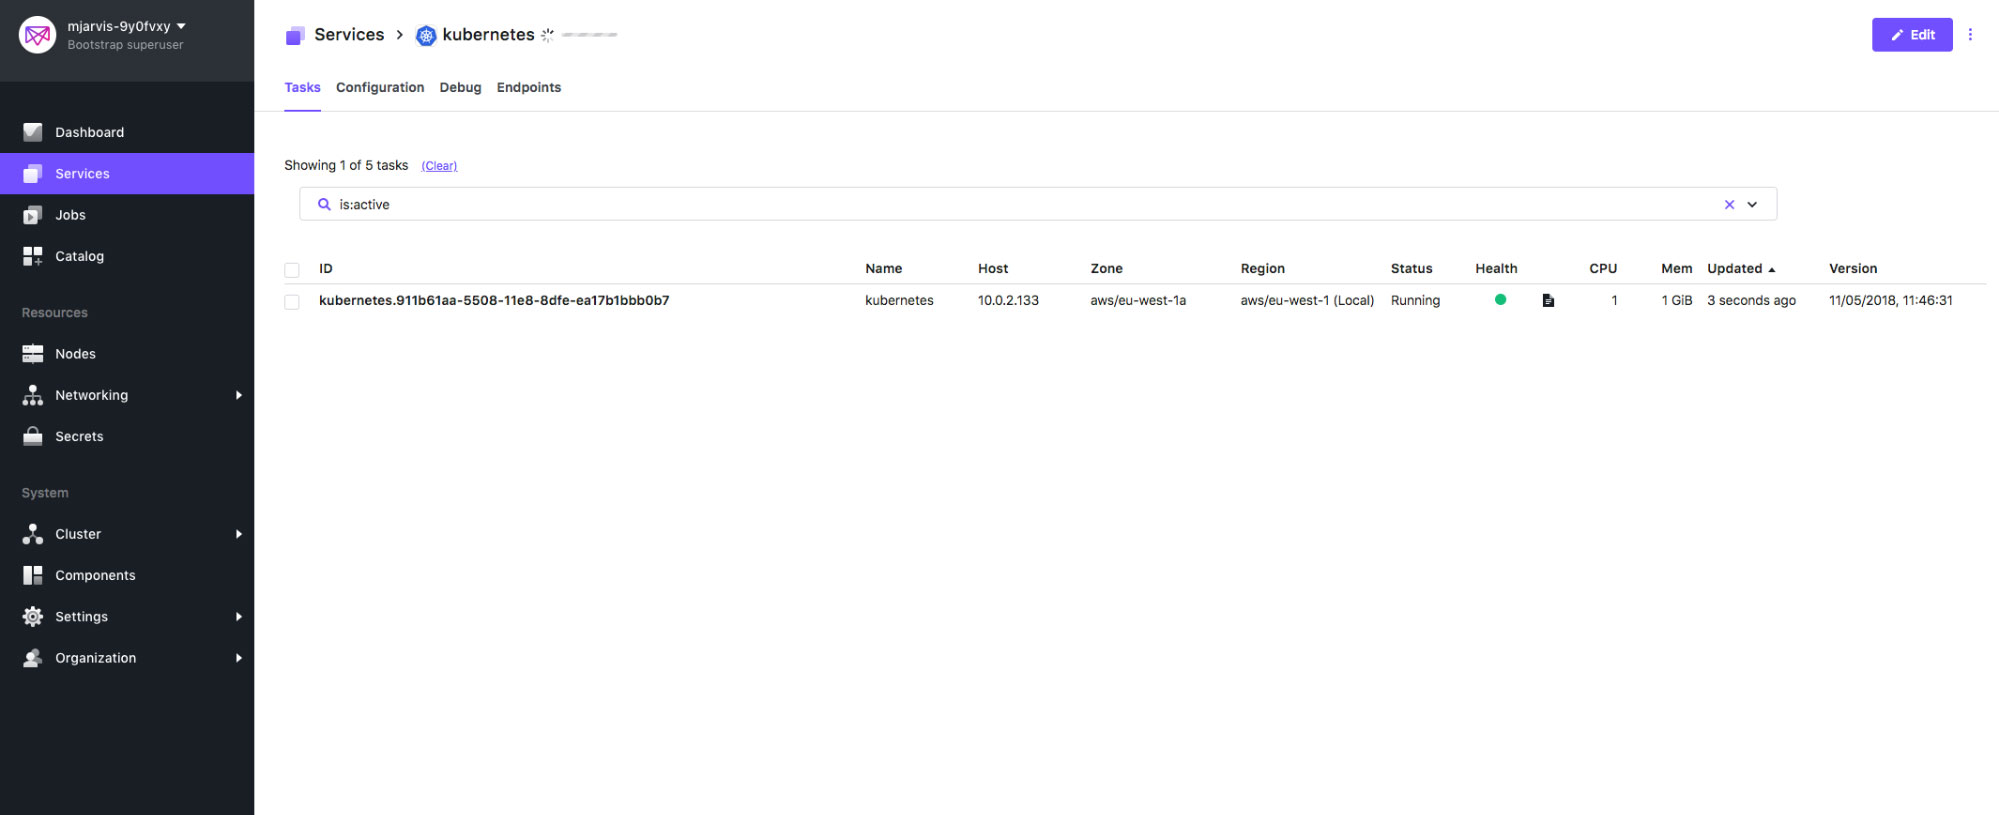
You may be wondering why we only have one framework scheduler in our high availability installation. This is because the framework scheduler is managed by Mesos, which itself is highly available in a DC/OS cluster, with multiple Mesos master schedulers managed as systemd units at the operating system layer. If the Kubernetes framework scheduler should die for any reason during normal operation, it won't affect the underlying operations of the Kubernetes cluster itself because it will be redeployed by Mesos.
Once the framework scheduler is deployed, the first thing it's going to do is bring up the etcd cluster, and make sure that etcd is working correctly. Since we've asked for a highly available cluster, the base configuration for this is 3 etcd peers, and we'll see those being created in the Services tab.
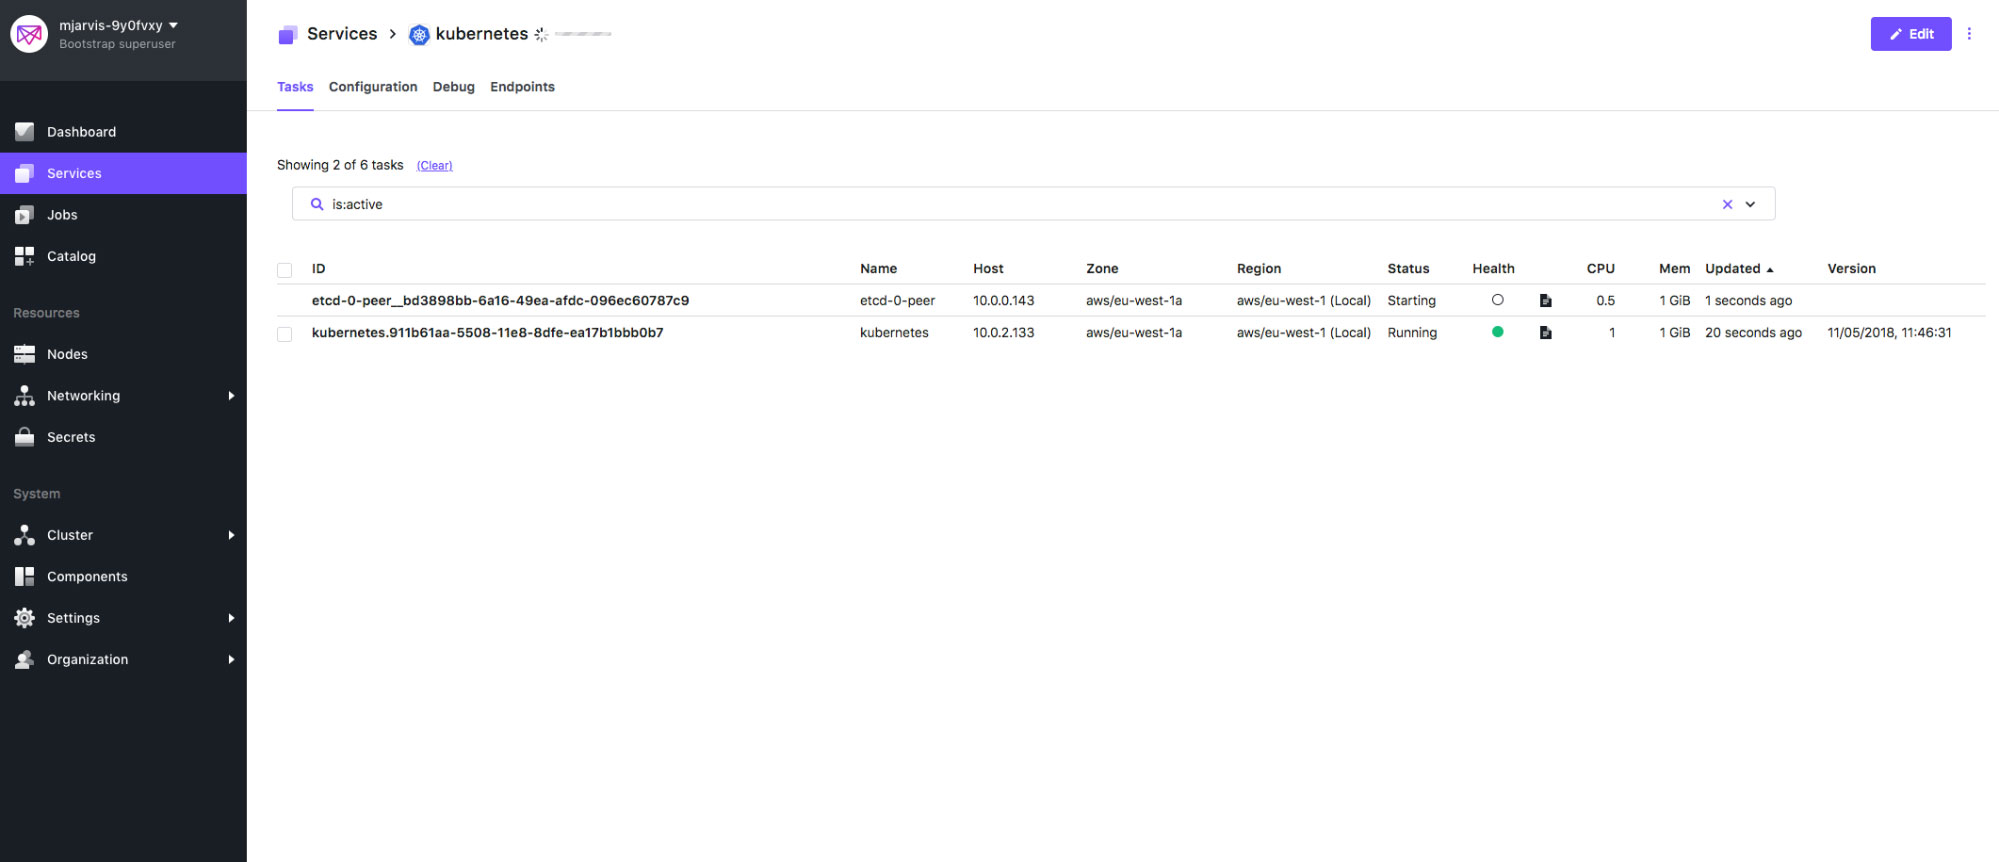
Once the etcd cluster is deployed and functional, the framework scheduler will start to deploy the Kubernetes control-plane components, and then the worker node elements.
Frameworks actually give us a way to understand the different lifecycle actions they know about, and the order they are going to do things in, right from the CLI. In SDK terminology these are known as plans, so let's look at the plans our Kubernetes framework scheduler knows about:
Mattbook-Pro:kube matt$ dcos kubernetes plan list[ "deploy", "recovery", "replace", "update", "uninstall"]
We can see that our scheduler has plans for deploy, recovery, replace, update and uninstall. Let's look in more detail at the plan for deployment.
Mattbook-Pro:kube matt$ dcos kubernetes plan status deploydeploy (serial strategy) (IN_PROGRESS)├─ etcd (serial strategy) (COMPLETE)│ ├─ etcd-0:[peer] (COMPLETE)│ ├─ etcd-1:[peer] (COMPLETE)│ └─ etcd-2:[peer] (COMPLETE)├─ apiserver (parallel strategy) (COMPLETE)│ ├─ kube-apiserver-0:[instance] (COMPLETE)│ ├─ kube-apiserver-1:[instance] (COMPLETE)│ └─ kube-apiserver-2:[instance] (COMPLETE)├─ kubernetes-api-proxy (parallel strategy) (COMPLETE)│ └─ kubernetes-api-proxy-0:[install] (COMPLETE)├─ controller-manager (parallel strategy) (COMPLETE)│ ├─ kube-controller-manager-0:[instance] (COMPLETE)│ ├─ kube-controller-manager-1:[instance] (COMPLETE)│ └─ kube-controller-manager-2:[instance] (COMPLETE)├─ scheduler (parallel strategy) (COMPLETE)│ ├─ kube-scheduler-0:[instance] (COMPLETE)│ ├─ kube-scheduler-1:[instance] (COMPLETE)│ └─ kube-scheduler-2:[instance] (COMPLETE)├─ node (parallel strategy) (IN_PROGRESS)│ ├─ kube-node-0:[kube-proxy] (COMPLETE)│ ├─ kube-node-0:[coredns] (COMPLETE)│ ├─ kube-node-0:[kubelet] (STARTED)│ ├─ kube-node-1:[kube-proxy] (COMPLETE)│ ├─ kube-node-1:[coredns] (COMPLETE)│ ├─ kube-node-1:[kubelet] (COMPLETE)│ ├─ kube-node-2:[kube-proxy] (COMPLETE)│ ├─ kube-node-2:[coredns] (COMPLETE)│ └─ kube-node-2:[kubelet] (STARTED)├─ public-node (parallel strategy) (COMPLETE)└─ mandatory-addons (serial strategy) (PENDING) ├─ mandatory-addons-0:[kube-dns] (PENDING) ├─ mandatory-addons-0:[metrics-server] (PENDING) ├─ mandatory-addons-0:[dashboard] (PENDING) └─ mandatory-addons-0:[ark] (PENDING)
From the plan we can see that certain operations, like bringing up our etcd peers, have to be done serially, while the other tasks are safe to perform in parallel. We can also see the order in which the scheduler will bring up these different elements.
Using this command, we can also see when the plan is fully completed:
Mattbook-Pro:kube matt$ dcos kubernetes plan status deploydeploy (serial strategy) (COMPLETE)├─ etcd (serial strategy) (COMPLETE)│ ├─ etcd-0:[peer] (COMPLETE)│ ├─ etcd-1:[peer] (COMPLETE)│ └─ etcd-2:[peer] (COMPLETE)├─ apiserver (parallel strategy) (COMPLETE)│ ├─ kube-apiserver-0:[instance] (COMPLETE)│ ├─ kube-apiserver-1:[instance] (COMPLETE)│ └─ kube-apiserver-2:[instance] (COMPLETE)├─ kubernetes-api-proxy (parallel strategy) (COMPLETE)│ └─ kubernetes-api-proxy-0:[install] (COMPLETE)├─ controller-manager (parallel strategy) (COMPLETE)│ ├─ kube-controller-manager-0:[instance] (COMPLETE)│ ├─ kube-controller-manager-1:[instance] (COMPLETE)│ └─ kube-controller-manager-2:[instance] (COMPLETE)├─ scheduler (parallel strategy) (COMPLETE)│ ├─ kube-scheduler-0:[instance] (COMPLETE)│ ├─ kube-scheduler-1:[instance] (COMPLETE)│ └─ kube-scheduler-2:[instance] (COMPLETE)├─ node (parallel strategy) (COMPLETE)│ ├─ kube-node-0:[kube-proxy] (COMPLETE)│ ├─ kube-node-0:[coredns] (COMPLETE)│ ├─ kube-node-0:[kubelet] (COMPLETE)│ ├─ kube-node-1:[kube-proxy] (COMPLETE)│ ├─ kube-node-1:[coredns] (COMPLETE)│ ├─ kube-node-1:[kubelet] (COMPLETE)│ ├─ kube-node-2:[kube-proxy] (COMPLETE)│ ├─ kube-node-2:[coredns] (COMPLETE)│ └─ kube-node-2:[kubelet] (COMPLETE)├─ public-node (parallel strategy) (COMPLETE)└─ mandatory-addons (serial strategy) (COMPLETE) ├─ mandatory-addons-0:[kube-dns] (COMPLETE) ├─ mandatory-addons-0:[metrics-server] (COMPLETE) ├─ mandatory-addons-0:[dashboard] (COMPLETE) └─ mandatory-addons-0:[ark] (COMPLETE
Once our plan has completed and our Kubernetes cluster is up and running, we can now configure kubectl on our local machine to interact with our cluster. One of the most valuable aspects of Kubernetes is the API for application management and deployment which is standardized across any platform. A big advantage of deploying Kubernetes with DC/OS is that it allows users interact with the Kubernetes cluster in exactly the way they are used to, using standard tooling and the latest upstream Kubernetes code (in contrast to other vendor distributions that modify or abstract the base tech). Kubernetes deployed by the framework is entirely unmodified from the upstream, and our framework tracks upstream releases closely. We're fully certified as compatible with the upstream releases, so interacting with a Kubernetes cluster running in DC/OS is exactly the same as interacting with any other Kubernetes cluster.
The DC/OS Kubernetes CLI extension gives us a trivial way to configure our local kubectl, with a single command, so let's go ahead and set that up:
Mattbook-Pro:kube matt$ dcos kubernetes kubeconfigkubeconfig context 'mjarvis-9y0fvxy' created successfully
This will configure kubectl to point at our running Kubernetes cluster in DC/OS and we can check that works by running:
Mattbook-Pro:kube matt$ kubectl get nodesNAME STATUS AGE VERSIONkube-node-0-kubelet.kubernetes.mesos Ready 8m v1.9.6kube-node-1-kubelet.kubernetes.mesos Ready 9m v1.9.6kube-node-2-kubelet.kubernetes.mesos Ready 8m v1.9.6
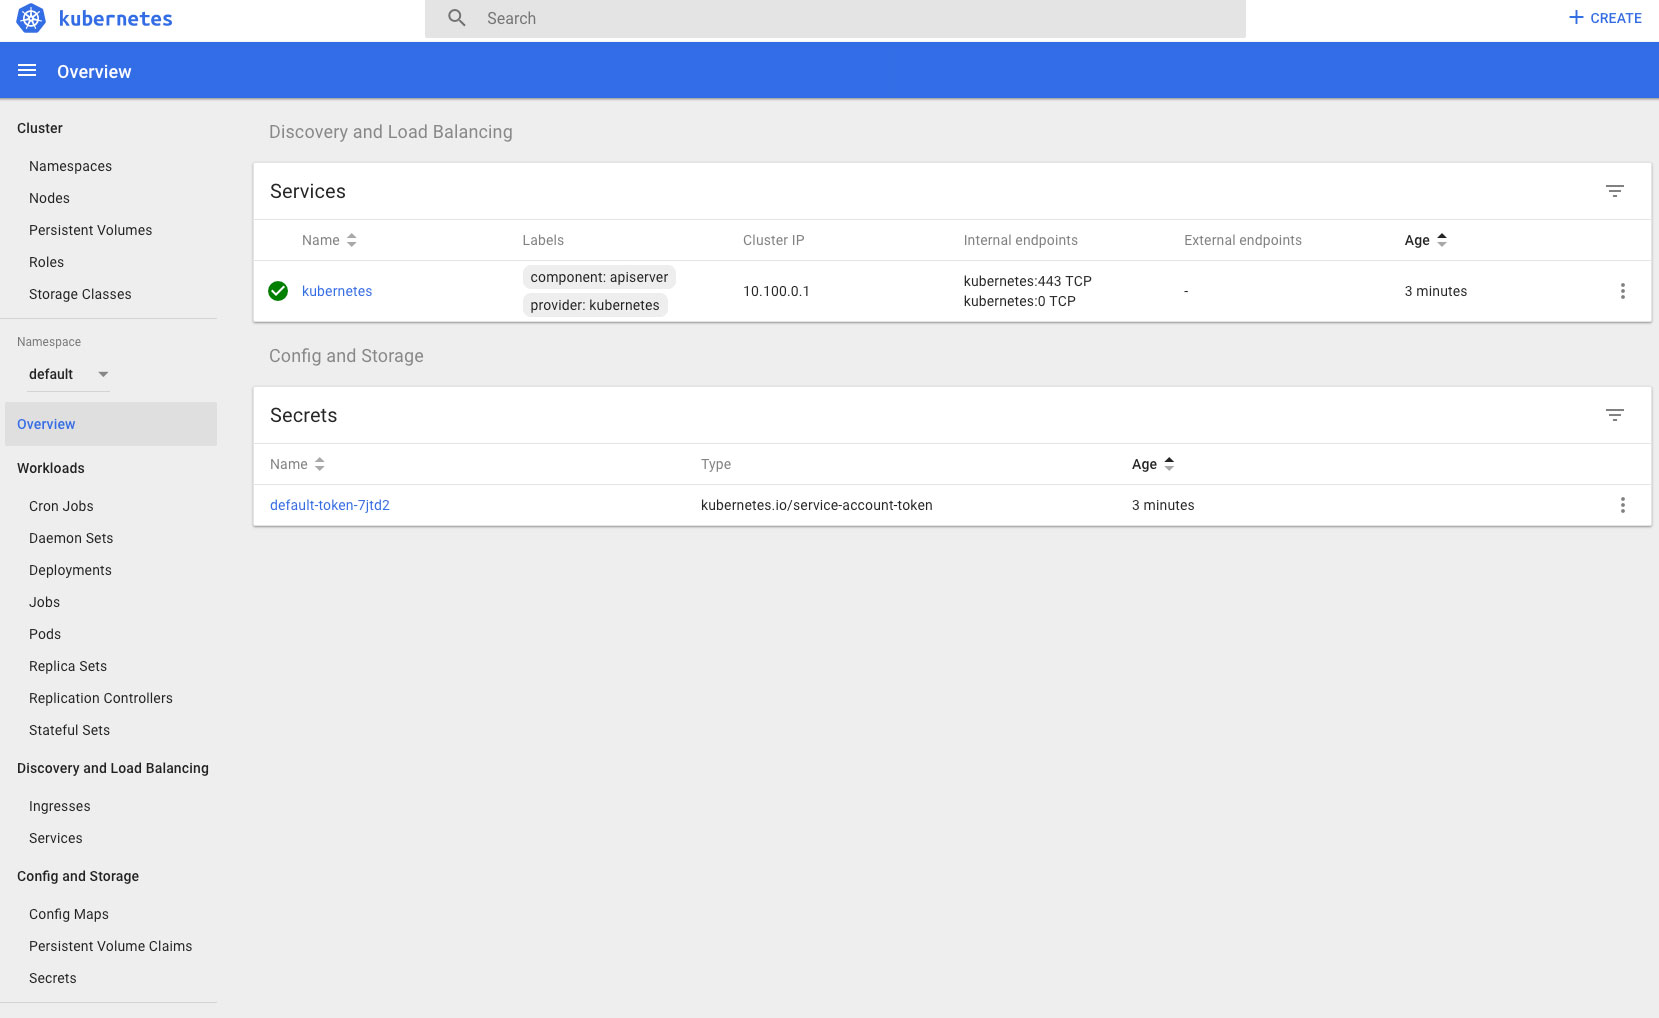
Going back to our Services tab, at the top level we can see a second Kubernetes related service which has been deployed automatically, called kubernetes-proxy.
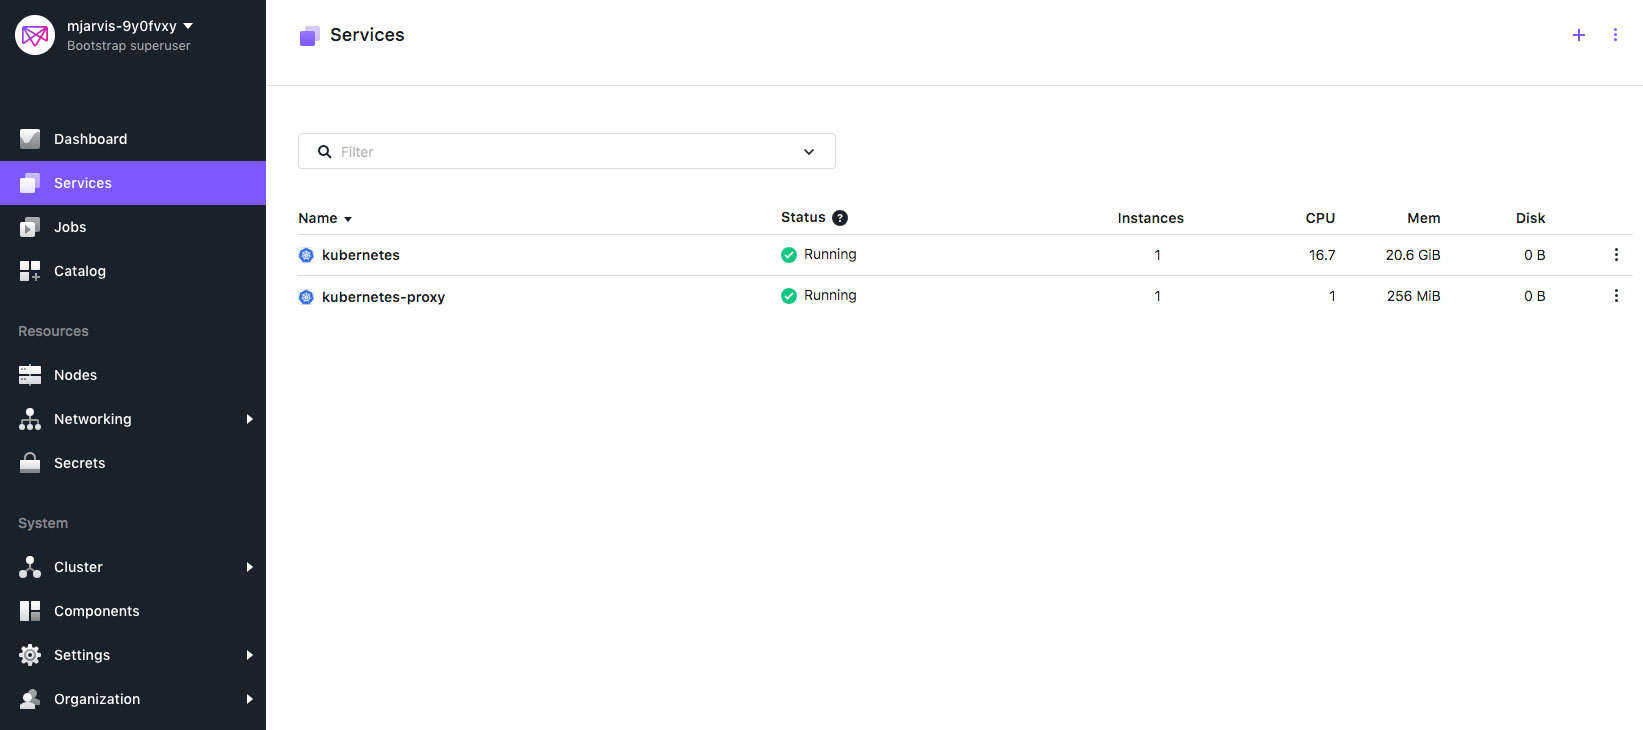
This is not to be confused with the kube-proxy processes which our Kubernetes framework scheduler is deploying into Kubernetes nodes. This top level proxy enables API and UI communication from outside of our DC/OS cluster, allowing traffic to access the kubernetes API server, and the kubernetes UI, which are running inside our DC/OS cluster on private agents. If we hover over the kubernetes-proxy we see a small link, and if we click that link the native Kubernetes UI will open in a new tab.
One of the key functions of the scheduler is to make sure that all the elements of our Kubernetes cluster keep running. We can illustrate this by mimicking a failure to one of those elements - in our case one of the etcd peers. Since we're running an HA cluster, our etcd service is clustered and will continue to run despite the loss of one of the peers, but don't do this if you're running a non-HA cluster, as Kubernetes requires a working etcd service at all times.
Mattbook-Pro:kube matt$ dcos task exec -it etcd-0-peer pkill etcd
The dcos task exec command allows us to run arbitrary commands directly inside a container running in DC/OS. This is much like docker exec, except in our case we don't need SSH keys deployed in every container, since in DC/OS this command uses an HTTPS endpoint on the agent hosting the container. The command above will shell into the etcd-0-peer container and force kill the etcd process.
If we switch back to our Services tab, we'll see the service immediately killed, and within a second or two the framework scheduler notices this and spawns a new etcd-0-peer process.
In the Kubernetes plan, losing an etcd peer is actually an action which doesn't have dependencies, so the scheduler knows it can just relaunch a new one, but other actions have more complex ordering. If we lose a kubelet for example, the scheduler knows it also needs to restart the kube-proxy and kube-dns processes which are running in the same node, and will do that before restarting the kubelet itself.
One of the most complex tasks in distributed systems is performing upgrades. This requires specific ordering and testing of upgraded services before moving on to the next action, and our framework scheduler encapsulates all of this information. When we deployed Kubernetes we specified version 1.0.2-1.9.6, but let's check what the latest version is using the CLI:
Mattbook-Pro:kube matt$ dcos package describe kubernetes --package-versions[ "1.0.3-1.9.7", "1.0.2-1.9.6", "1.0.1-1.9.4", "1.0.0-1.9.3"]
We can see our latest version in the DC/OS catalog is actually 1.0.3-1.9.7, so let's go ahead and perform an upgrade.
First, let's look at the actions the framework scheduler is going to take :
Mattbook-Pro:kube matt$ dcos kubernetes plan show updateupdate (serial strategy) (WAITING)├─ etcd (serial strategy) (PENDING)│ ├─ etcd-0:[peer] (PENDING)│ ├─ etcd-1:[peer] (PENDING)│ └─ etcd-2:[peer] (PENDING)├─ apiserver (serial strategy) (PENDING)│ ├─ kube-apiserver-0:[instance] (PENDING)│ ├─ kube-apiserver-1:[instance] (PENDING)│ └─ kube-apiserver-2:[instance] (PENDING)├─ kubernetes-api-proxy (serial strategy) (PENDING)│ └─ kubernetes-api-proxy-0:[install] (PENDING)├─ controller-manager (serial strategy) (PENDING)│ ├─ kube-controller-manager-0:[instance] (PENDING)│ ├─ kube-controller-manager-1:[instance] (PENDING)│ └─ kube-controller-manager-2:[instance] (PENDING)├─ scheduler (serial strategy) (PENDING)│ ├─ kube-scheduler-0:[instance] (PENDING)│ ├─ kube-scheduler-1:[instance] (PENDING)│ └─ kube-scheduler-2:[instance] (PENDING)├─ node (serial strategy) (PENDING)│ ├─ kube-node-0:[kube-proxy] (PENDING)│ ├─ kube-node-0:[coredns] (PENDING)│ ├─ kube-node-0:[kubelet] (PENDING)│ ├─ kube-node-1:[kube-proxy] (PENDING)│ ├─ kube-node-1:[coredns] (PENDING)│ ├─ kube-node-1:[kubelet] (PENDING)│ ├─ kube-node-2:[kube-proxy] (PENDING)│ ├─ kube-node-2:[coredns] (PENDING)│ └─ kube-node-2:[kubelet] (PENDING)├─ public-node (serial strategy) (COMPLETE)└─ mandatory-addons (serial strategy) (PENDING) ├─ mandatory-addons-0:[kube-dns] (PENDING) ├─ mandatory-addons-0:[metrics-server] (PENDING) ├─ mandatory-addons-0:[dashboard] (PENDING) └─ mandatory-addons-0:[ark] (PENDING)
This shows us the ordering the scheduler is going to use when performing that upgrade action.
Now lets go ahead and do the upgrade. Once the upgrade is completed, our CLI command will return, letting us know that it is complete.
Mattbook-Pro:kube matt$ dcos kubernetes update --package-version=1.0.3-1.9.7 About to start an update from version 1.0.2-1.9.6 to 1.0.3-1.9.7
Updating these components means the Kubernetes cluster may experience some downtime or, in the worst-case scenario, cease to function properly. Before updating proceed cautiously and always backup your data.
This operation is long-running and has to run to completion.
Are you sure you want to continue? [yes/no] yes2018/05/11 11:01:18 starting update process...2018/05/11 11:01:18 waiting for update to finish...2018/05/11 11:09:28 update complete!
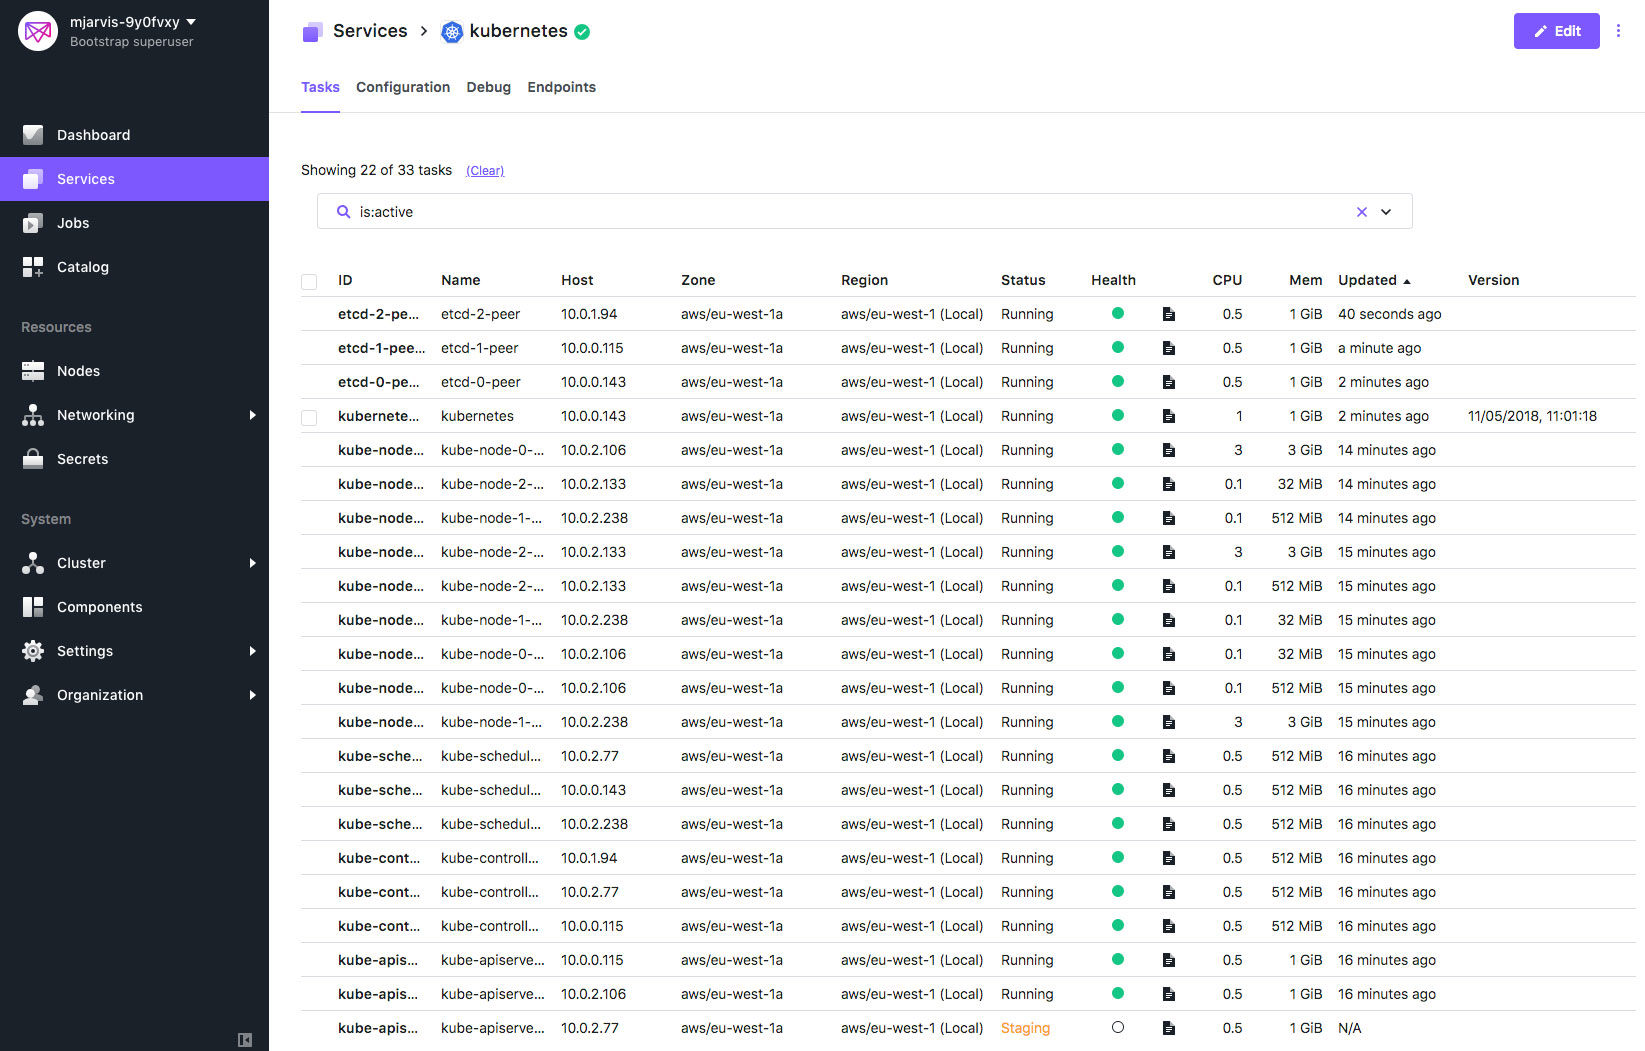
If we watch the Services tab during the upgrade, we can see the cluster being upgraded element by element, and this will take some time as the scheduler needs to wait for health checks before moving on in the process.
Once the upgrade is completed, we can then check that our Kubernetes cluster is fully upgraded, using kubectl :
Mattbook-Pro:kube matt$ kubectl get nodesNAME STATUS AGE VERSIONkube-node-0-kubelet.kubernetes.mesos Ready 23m v1.9.7kube-node-1-kubelet.kubernetes.mesos Ready 23m v1.9.7kube-node-2-kubelet.kubernetes.mesos Ready 23m v1.9.7
We can now see all of our Kubernetes nodes are running the latest version 1.9.7
One of the other critical functions our framework scheduler can perform is to scale our Kubernetes cluster. In order to do this we need to modify our JSON configuration file and change the node_count attribute, so let's go ahead and change that from 3 to 4.
{ "service": { "name": "kubernetes", "sleep": 1000, "service_account": "", "service_account_secret": "", "log_level": "INFO" }, "kubernetes": { "high_availability": true, "service_cidr": "10.100.0.0/16", "network_provider": "dcos", "node_count": 4, "cloud_provider": "(none)", "public_node_count": 0, "reserved_resources": { "kube_cpus": 2, "kube_mem": 2048, "kube_disk": 10240, "system_cpus": 1, "system_mem": 1024 } }, "etcd": { "cpus": 0.5, "mem": 1024, "data_disk": 3072, "wal_disk": 512, "disk_type": "ROOT" }, "scheduler": { "cpus": 0.5, "mem": 512 }, "controller_manager": { "cpus": 0.5, "mem": 512 }, "apiserver": { "cpus": 0.5, "mem": 1024 }, "kube_proxy": { "cpus": 0.1, "mem": 512 }}Once again we use the DC/OS CLI to apply the updated configuration to the framework scheduler.
Mattbook-Pro:kube matt$ dcos kubernetes update --options=kube.json The following differences were detected between service configurations (CHANGED, CURRENT): { "apiserver": { "cpus": 0.5, "mem": 1024 }, "controller_manager": { "cpus": 0.5, "mem": 512 }, "etcd": { "cpus": 0.5, "data_disk": 3072, "disk_type": "ROOT", "mem": 1024, "wal_disk": 512 }, "kube_proxy": { "cpus": 0.1, "mem": 512 }, "kubernetes": { "cloud_provider": "(none)", "high_availability": true, "network_provider": "dcos",- "node_count": 3,+ "node_count": 4 "public_node_count": 0, "reserved_resources": { "kube_cpus": 2, "kube_disk": 10240, "kube_mem": 2048, "system_cpus": 1, "system_mem": 1024 }, "service_cidr": "10.100.0.0/16" }, "scheduler": { "cpus": 0.5, "mem": 512 }, "service": { "log_level": "INFO", "name": "kubernetes", "service_account": "", "service_account_secret": "", "sleep": 1000 } }The components of the cluster will be updated according to the changes in the options file kube.json.
Updating these components means the Kubernetes cluster may experience some downtime or, in the worst-case scenario, cease to function properly. Before updating proceed cautiously and always backup your data. This operation is long-running and has to run to completion.
Are you sure you want to continue? [yes/no] yes2018/05/11 11:15:39 starting update process...2018/05/11 11:15:40 waiting for update to finish...2018/05/11 11:17:50 update complete!
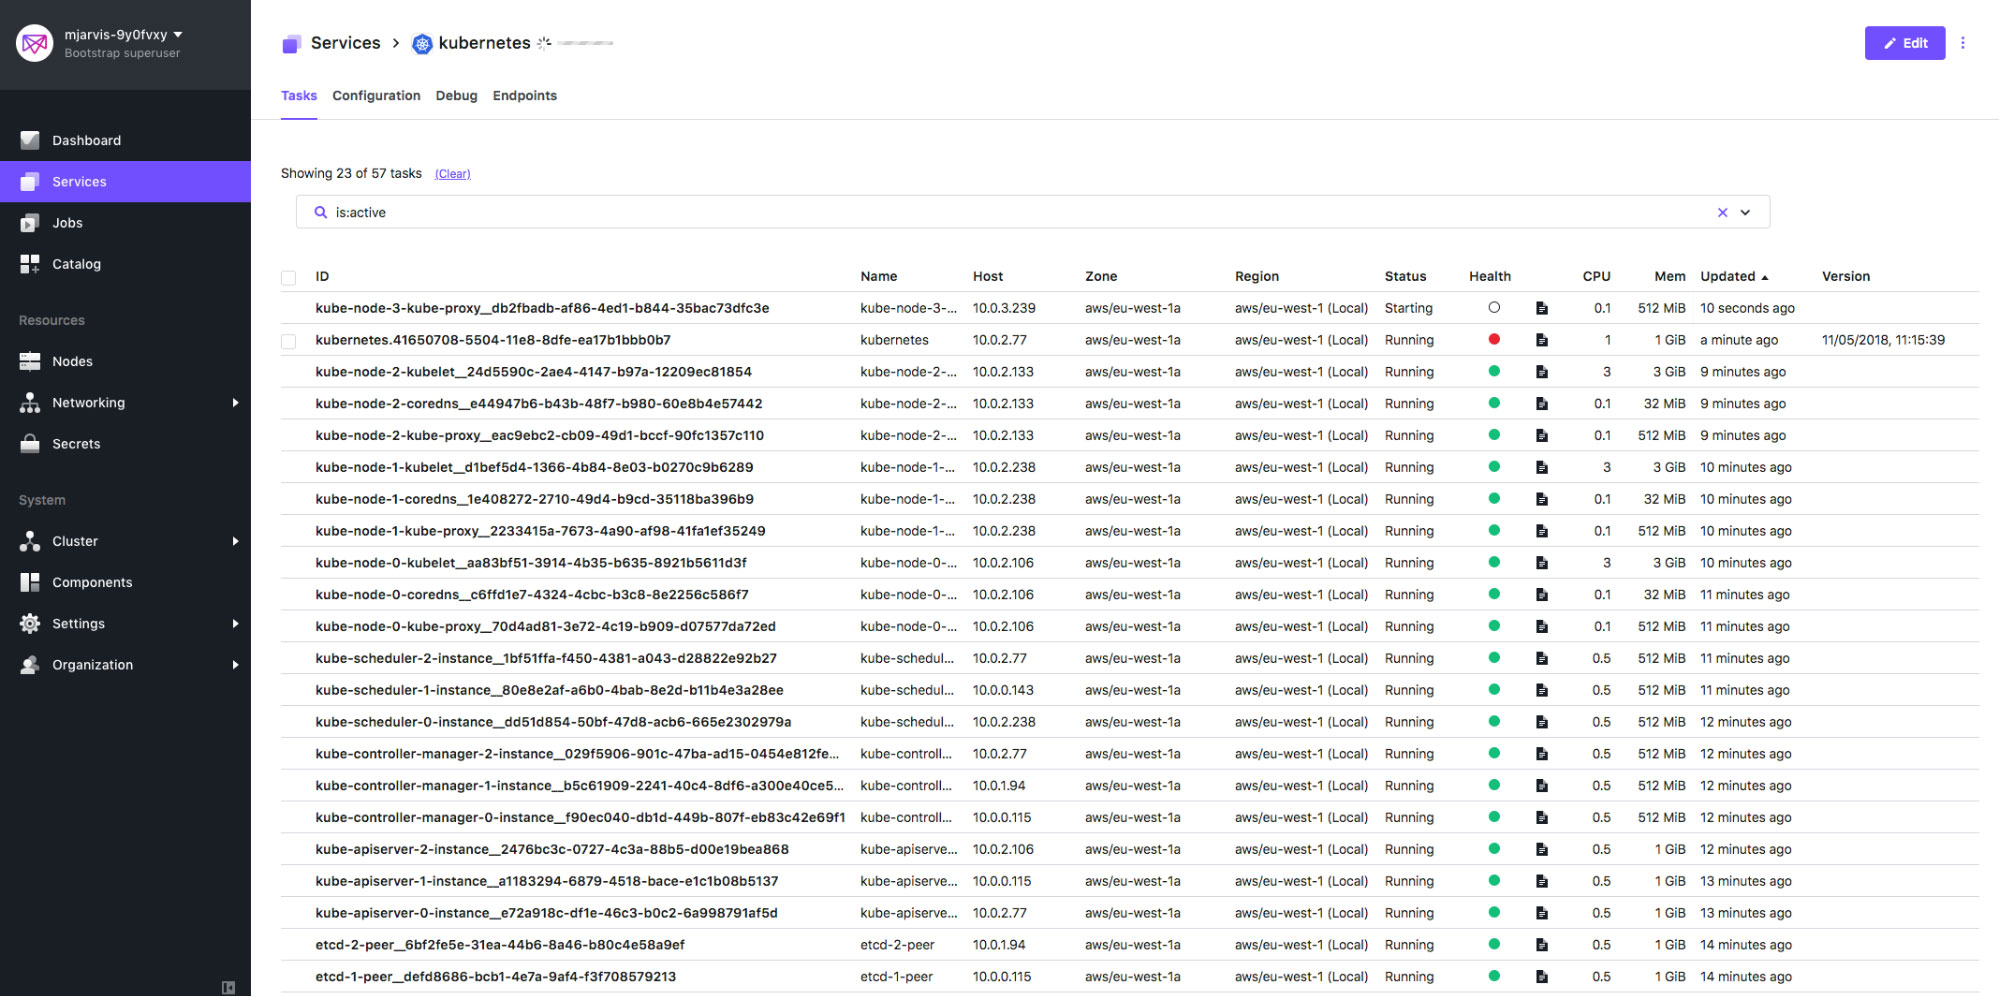
When we look at the Services tab during this update, we will start to see a fourth Kubernetes node being provisioned:
And once that process is completed, we can use kubectl to see our fourth Kubernetes node has been added to our cluster:
Mattbook-Pro:kube matt$ kubectl get nodesNAME STATUS AGE VERSIONkube-node-0-kubelet.kubernetes.mesos Ready 29m v1.9.7kube-node-1-kubelet.kubernetes.mesos Ready 29m v1.9.7kube-node-2-kubelet.kubernetes.mesos Ready 29m v1.9.7kube-node-3-kubelet.kubernetes.mesos Ready 1m v1.9.7
It's also relatively easy to see from this how an autoscaling cluster could be built using input from external monitoring to trigger this process.
So it should be clear that framework schedulers are much more than just package installers. They manage the lifecycle of an application, encode operational knowledge, and provide us with easy, automatable methods for performing complex operational tasks. Kubernetes clusters in DC/OS are now trivial to deploy, run and upgrade.
Automated as-a-Service Management of Kubernetes
DC/OS automates the manual and repetitive tasks of managing a Kubernetes cluster and surrounding services needed for an end-to-end container solution. WIth DC/OS, operations can deliver Kubernetes, Jenkins, Gitlab and more as-a-Service for every line of business without the worry of being locked into particular premium infrastructure.
Push-Button Kubernetes for Existing Customers
For current Mesosphere customers, after transitioning to DC/OS 1.11, it is easy to spin up a highly available Kubernetes cluster for production workloads with a single push of a button or single command line. For more information see official documentation.
Quickstart for New Open Source DC/OS Users
For those that are new to DC/OS, there is now a Quickstart to get you up and running quickly. There are Terraform templates for AWS, Microsoft Azure and Google Cloud to help you provision cloud instances, DC/OS, and a Kubernetes cluster with a few commands.